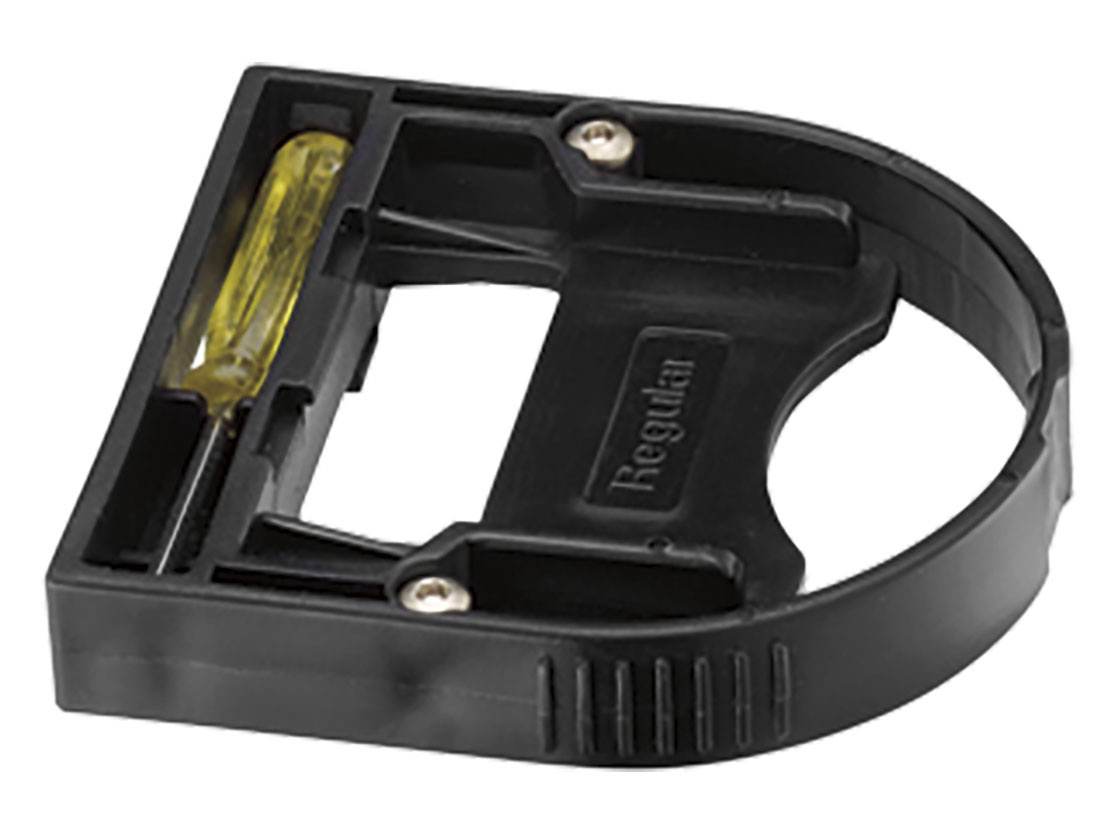
The babyliss zero gap tool helps you align a compatible trimmer’s cutting blades for a closer, more precise cut. It holds the blades in position while you adjust and tighten them. The moving blade must never extend past the fixed blade, as this can cause cuts or scratches.
Barbers across the United States use detail trimmers to shape hairlines, clean up necklines, and create sharp beard edges. A well-set trimmer can help with this work, but blade alignment plays a key role. The BaBylissPRO zero gap adjustment tool is made to help set the blade position on compatible trimmers.
Zero gapping does not mean forcing both blades into contact. It means setting the moving blade very close to the fixed blade while keeping the teeth aligned. BaBylissPRO manuals explain that a close blade setting can improve cutting precision, but poor alignment can cut or scratch the skin. The correct setup depends on the trimmer model, its blade design, and the instructions supplied with it.
This guide explains what the tool does, how to use it, which mistakes to avoid, and how to care for the blades afterward. It also covers common problems, model compatibility, and when it is better to leave the adjustment to a trained barber or service professional.
A BaByliss zero gap tool is a small blade alignment aid used with compatible BaBylissPRO trimmers. It helps hold the blade parts in a set position while the blade screws are loosened, adjusted, and tightened. The goal is a close cutting setup for detail work.
The tool is not a motor part, a replacement blade, or a device that sharpens dull teeth. It helps position the blades. A blade can still cut poorly if it is dull, dirty, damaged, or fitted incorrectly.
BaBylissPRO includes zero gap adjustment instructions with certain trimmer models. Those instructions matter because blade shapes, screw locations, and adjustment methods can differ across product lines. Do not assume that every BaByliss trimmer uses the same tool or setup.
Source: storage.googleapis.com
Main purpose
Helps align the moving cutter and fixed comb blade for close, precise trimming.
Typical users
Barbers, hairstylists, and experienced home users who need detailed edge work.
What it cannot do
It cannot repair chipped teeth, restore worn blades, or make an incompatible blade fit.
What Does Zero Gapping Mean?
A trimmer has two main blade parts. The fixed blade, also called the comb, sits on the outside. The moving cutter slides rapidly behind it and cuts hair as the teeth pass each other.
Zero gapping means adjusting the moving cutter very close to the edge of the fixed blade. The name can be misleading because the teeth should not be forced into contact. The correct position depends on the manufacturer’s instructions and the blade design.
A close setting can help a barber create crisp lines around a beard, sideburns, or hairline. However, the closer setting leaves less room for error. If the moving teeth extend beyond the fixed blade, they may scratch or cut the skin.
Fixed blade
The outer comb that guides hair toward the moving cutter and protects part of the cutting assembly.
Moving blade
The smaller cutter that moves back and forth to cut hair.
Zero Gap Tool Versus a Regular Trimmer
A regular trimmer can work well without a zero gap adjustment. Many users can shape a beard or clean a neckline with the factory blade setting. The adjustment tool is useful when a closer setting is needed and the manufacturer permits that change.
The tool itself does not make a trimmer more powerful. It changes blade position, not motor speed or battery capacity. The final result also depends on blade condition, hair type, technique, and the angle used against the skin.
Factory setting
Usually the sensible starting point for a new user or anyone who does not need very close detail work.
Adjusted setting
May suit experienced users who want finer lines and understand the added risk of poor blade alignment.
Why Do Barbers Use a BaByliss Zero Gap Tool?
Barbers use a close blade setting when they need more control over fine lines and short stubble. A properly aligned trimmer can help clean up the edges of a haircut without needing a larger clipper. It is often useful for work around the temples, beard outline, sideburns, and neckline.
The benefit is most clear during detail work. A barber may need a clean line around the ear or a sharp border along the cheek. A closer blade setting can help remove very short hairs along that edge, provided the trimmer is designed for the task and the user has good control.
Still, zero gapping is not a must for every haircut. A standard setting may be more suitable for general trimming, sensitive skin, or users who have little experience with blade adjustment. A very close setting also cannot replace careful hand control.
Source: baressoshop.se
Sharper-looking edges
A suitable close setting can help remove short hairs along a defined hairline or beard outline.
Detailed shaping
The trimmer can help tidy sideburns, necklines, and the edges around a mustache.
More control over the setup
The adjustment tool helps keep the blade parts in position while the screws are tightened.
Not a substitute for skill
Good results still depend on a steady hand, proper angle, clean blades, and suitable pressure.
Who Should Consider Using One?
Experienced barbers may find the tool useful when they want a closer cutting setup for precise outlines. Home users may also benefit if they understand the instructions for their model and are comfortable working with small blade screws.
Beginners should first learn to use the trimmer at its factory setting. If the tool is unfamiliar or the blade design is hard to assess, ask a barber or authorized service professional to make the adjustment. A close shave is not worth an avoidable skin injury.
Good fit
Users who need precise edge work, own a compatible trimmer, and can follow the exact adjustment steps.
Poor fit
Anyone with a damaged blade, missing instructions, uncertain compatibility, or little confidence handling the blade assembly.
How to Use a BaByliss Zero Gap Tool
Use the zero gap tool only if your trimmer’s manual allows blade adjustment with that tool. Start with the manufacturer’s instructions for the exact model. The steps below reflect the general method described in BaBylissPRO adjustment manuals, but they do not replace model-specific directions.
Before you begin, turn the trimmer off and disconnect it from its power source. Remove any charging cable or adapter. Place the trimmer on a clean, dry, stable surface with enough light to see the blade teeth and screws.
Keep your fingers clear of the cutting edges. Do not power on the trimmer while the blade screws are loose or the adjustment tool is in place. If any blade part is bent, chipped, loose, or damaged, stop and arrange proper service or replacement.
Source: BaBylissPRO Barber & Styling on YouTube
What you need
A compatible BaByliss zero gap tool, the correct screwdriver, the model’s instruction manual, and a clean work surface.
Before starting
Switch off and unplug the trimmer, then check that the blade assembly and screws are in good condition.
Step 1: Check the Blade and Tool
Read the adjustment section in your trimmer manual. Confirm that the tool matches the blade assembly and that the blade is intended to be adjusted. A tool that looks close to the right size may still sit incorrectly on the blade.
Brush away loose hair so it does not get trapped between the blade parts. Look at the teeth under good light. Do not continue if you see chips, bends, heavy rust, or signs that the blade has been fitted incorrectly.
Check the model
Use the model number on the trimmer or its packaging to locate the correct instructions.
Check the blade
Make sure the teeth are intact and the blade sits flat against the trimmer.
Step 2: Loosen the Blade Screws Slightly
Use the screwdriver specified in the manual to loosen the blade screws just enough to let the blade move. BaBylissPRO instructions for supported models describe loosening the two small screws at the sides of the blade. Do not remove the screws unless the model’s instructions call for removal.
Keep the screws in place and avoid using excessive force. A slipping screwdriver can damage the screw heads or scratch the blade. If a screw will not turn with gentle pressure, stop rather than forcing it.
Use the right driver
A proper fit helps reduce the chance of stripping the screw head.
Loosen only as needed
The blade should move in a controlled way without becoming detached.
Step 3: Fit the Zero Gap Tool
Slide the adjustment tool over the fixed blade as shown in the manufacturer’s diagram. On supported models, the tool sits against the back portion of the moving cutting blade. Make sure it is seated correctly and does not rock or slip.
The tool acts as a guide while you position the blade. Do not force it into place or use a tool meant for another blade assembly. If it does not fit naturally, remove it and check the model and instructions again.
Correct fit
The tool should sit in the intended position and help guide the cutter without bending the teeth.
Wrong fit
A tool that catches, tilts, or will not sit properly should not be forced onto the blade.
Step 4: Adjust the Moving Blade
Follow the direction shown in the manual to move the cutter toward the desired position. BaBylissPRO manuals describe using your fingers on either side of the tool to guide the cutting blade until it is even with or slightly below the fixed blade, depending on the model.
Make small adjustments and inspect the blade from the front and side. Do not aim for the smallest possible gap at any cost. The moving teeth must never extend past the fixed blade, and the two rows of teeth must remain properly aligned.
Keep the cutter controlled
Move it gently while the tool is seated, without pressing hard on the teeth.
Watch the front edge
The moving cutting teeth must not project beyond the protective edge of the fixed blade.
Step 5: Tighten the Screws and Inspect
Once the blade is aligned, hold the adjustment tool in place as directed and tighten the screws firmly. Avoid overtightening or using extra force. The blade should sit securely and evenly, without a visible tilt or loose movement.
Remove the tool and inspect the teeth again. If the moving blade extends beyond the fixed blade, do not use the trimmer on skin. Return to the model’s instructions and correct the alignment, or have a qualified service professional do it.
Check alignment
Look for an even blade position and confirm that no moving tooth extends beyond the fixed blade.
Check stability
The blade should not shift or rattle when handled gently with the trimmer switched off.
Step 6: Test With Care
Follow the manual’s directions before switching the trimmer on. Keep your hands and face clear of the blade during the first check. Stop at once if the trimmer makes an unusual sound, vibrates in a new way, or appears to have a loose blade.
Do not test a newly adjusted blade by pressing it against your skin. If the cutting action seems uneven or the blade feels rough, switch the unit off and inspect the setup again. If the problem remains, return the blade to an approved setting or seek service.
A good result
The blade stays secure, the motor sounds normal, and the trimmer cuts without unusual pulling or vibration.
A failed result
Uneven cutting, scraping, excessive heat, loose parts, or unusual noise means you should stop and check the trimmer.
Which BaByliss Trimmers Can Use a Zero Gap Tool?
Compatibility depends on the exact trimmer and blade assembly. BaBylissPRO has several professional trimmer families, and their blade shapes, housings, and adjustment details can vary. The fact that a tool fits one FX-series trimmer does not prove that it fits every model in that range.
Some BaBylissPRO operating manuals include a dedicated zero gap adjustment section. This is the best place to confirm whether adjustment is supported and which steps apply. If your manual does not mention the process, contact BaBylissPRO support or an authorized service provider before loosening the blade.
Replacement blades also need a separate compatibility check. A zero gap tool may fit a blade assembly without confirming that a different blade is suitable for the trimmer. Check the model number and the blade manufacturer’s compatibility information before buying parts.
Source: Barber’s Lounge on YouTube
Check the full model number
Look at the product label or manual rather than relying on the general FX or FXONE family name.
Check the blade type
Confirm the blade assembly and adjustment tool are listed as compatible.
Check included accessories
Some trimmers include an adjustment tool, while other products or replacement blade packages may not.
Ask before modifying
Contact the manufacturer or an authorized service professional if the manual does not cover the adjustment.
Should You Buy a Separate Zero Gap Tool?
Buy a separate tool only after confirming that your trimmer needs one and that the tool fits its blade assembly. A kit may include a small screwdriver or other accessories, but the exact contents depend on the seller and product version.
Compare the model number, stated compatibility, included parts, and return policy. Product photos can help identify a tool, but a similar shape or color is not proof of compatibility. If your original tool is missing, the manufacturer’s parts information is a better starting point than guesswork.
Worth considering
A replacement tool may help if your manual calls for it and your original accessory is missing or damaged.
Not worth assuming
A universal fit claim should not replace confirmation that the tool works with your exact blade.
Zero Gap Tool vs. a Standard Blade Setting
A zero gap setup favors close detail work, while a standard blade setting gives the user more room for general trimming. Neither setup is automatically right for every job. The choice depends on the finish you want, your skill, the condition of your skin, and the blade design.
A standard setting is often enough to tidy a beard or clean the back of the neck. A closer setting may help define short edges and fine lines. However, a closer blade position can also raise the chance of irritation or cuts if the teeth sit too far forward or the trimmer is used at the wrong angle.
The best approach is to start with the factory setup and adjust only when there is a clear reason. If you use the trimmer on several people, follow suitable cleaning and disinfection procedures for the tool and blade, and follow all product instructions.
Source: SidhuTheBarber on YouTube
Standard setting
Useful for routine trimming, general cleanup, and users who want to keep the factory alignment.
Closer setting
May suit precise outlines and very short edge work when the trimmer supports the adjustment.
Key trade-off
A closer cut can mean less room for alignment error and more risk of skin irritation.
Is Zero Gapping Better for Sensitive Skin?
Not necessarily. Sensitive skin may react to close blade contact, repeated passes, or pressure even when the blades are aligned correctly. A zero gap adjustment does not make a trimmer gentler by itself.
If you get redness, bumps, burning, or small cuts after trimming, try the factory setting, use lighter pressure, and avoid repeated passes over the same spot. Do not use a blade that scratches or catches the skin. Persistent or severe skin problems may need advice from a qualified health professional.
Use light pressure
Let the trimmer do the work rather than pressing the teeth into the skin.
Avoid repeated passes
Repeatedly trimming the same area can increase friction and irritation.
Stop if it hurts
Pain, scraping, or cuts are signs to stop and check the blade setup.
Common BaByliss Zero Gap Problems and Fixes
Most zero gap problems come from a poor fit, incorrect alignment, worn parts, or loose screws. Begin with the safest checks. Switch off and unplug the trimmer before touching the blade, then inspect the assembly under good light.
Do not keep moving the blade in search of a closer setting if the trimmer is cutting poorly. A blade that pulls hair may be dirty, dull, damaged, or incorrectly fitted. A motor problem or damaged blade cushion can also affect how the cutter moves, and these issues may need professional service.
Source: storage.googleapis.com
Problem: The blade scratches skin
Stop using the trimmer. Check whether the moving blade extends beyond the fixed blade. Correct the alignment according to the manual or seek professional service.
Problem: Hair gets pulled
Switch off the trimmer and clean away trapped hair. Inspect the teeth for damage and confirm the blade is fitted correctly.
Problem: The blade looks uneven
Check that the adjustment tool is seated correctly and that both sides of the blade are aligned. Do not use the trimmer until the blade sits securely.
Problem: Screws will not tighten
Stop if a screw head is stripped, a thread seems damaged, or the blade will not stay secure. Do not rely on a loose blade for trimming.
Problem: The trimmer becomes unusually hot
Switch it off and let it cool. Check for hair buildup and follow the blade care instructions. If heat returns quickly or the motor sounds unusual, seek service.
How to Tell Whether the Blade Is Set Correctly
A correct setup starts with secure screws, a stable blade, and aligned teeth. The moving cutter must not extend beyond the fixed blade. The exact spacing and final position should follow the manual for your model rather than a general rule copied from another trimmer.
Check the blade from more than one angle. A front view can reveal teeth that project too far forward, while a side view can help show whether the blade sits flat. If you cannot judge the alignment with confidence, do not test the blade on skin.
Look for
Even alignment, intact teeth, secure screws, and no visible movement in the blade assembly.
Do not accept
Bent teeth, a projecting moving blade, loose screws, or a blade that tilts when fitted.
When Should You Stop and Get Help?
Get professional help if the blade has chipped teeth, damaged threads, a loose blade cushion, or signs of impact damage. The same applies if the tool does not fit, the blade will not stay aligned, or the trimmer behaves differently after adjustment.
Use an authorized service provider when the problem goes beyond routine blade care. BaBylissPRO manuals direct users to authorized service for other repairs on models that do not have additional user-serviceable parts. The exact service limits depend on the model.
Stop immediately
The blade extends beyond the fixed edge, the housing is cracked, or the blade cannot be secured.
Seek service
The motor, blade drive, screw threads, or other internal parts appear damaged.
How to Clean and Maintain a Zero Gapped Trimmer
Regular cleaning helps keep a trimmer working as intended. Loose hair can collect between the teeth and affect cutting. Follow the manual for your model, since the care instructions may differ by blade type and power system.
BaBylissPRO manuals commonly direct users to brush away loose hair after use and apply a few drops of suitable blade oil where specified. Excess oil should be wiped away with a clean, dry cloth. Keep the trimmer housing clean as directed and never rinse parts that the manual says must stay dry.
Do not use household oils, harsh cleaners, or random lubricants in place of the recommended product. Store the trimmer where the teeth will not strike other tools. If you use it in a professional setting, follow the manufacturer’s cleaning guidance and the applicable sanitation rules for barber equipment.
Source: BaBylissPRO Barber & Styling on YouTube
Brush after use
Remove loose hair from the blade teeth with the cleaning brush supplied or another suitable brush recommended by the manufacturer.
Oil as directed
Use the recommended blade oil and amount. Wipe off excess oil before storage.
Keep the blade dry when required
Do not rinse the blade, handle, charging base, or other parts if the manual says not to.
Store with care
Protect the blade from knocks, moisture, dust, and contact with loose metal tools.
Does Zero Gapping Make Blades Wear Out Faster?
Zero gapping does not automatically mean that a blade will wear out faster. Blade life depends on the blade material, amount of use, cleaning, lubrication, impact damage, and how well the assembly is maintained.
A poor adjustment can cause the blade parts to rub or strike each other in ways the manufacturer did not intend. That can affect cutting performance and may damage the teeth. Correct alignment and routine care matter more than trying to make the blade gap as small as possible.
Help extend useful life
Keep the blade clean, lubricate it as directed, and avoid dropping the trimmer.
Replace damaged parts
Cleaning and oil cannot restore chipped teeth, bent blades, or worn drive parts.
Frequently Asked Questions
Q
What Does a BaByliss Zero Gap Tool Do?
A BaByliss zero gap tool helps position the moving and fixed blades on a compatible trimmer. It holds the blade parts in place during adjustment so the user can set up the trimmer for close, precise detail work. It does not sharpen the blades or repair damaged teeth.
Q
Can I Zero Gap My BaByliss Trimmer at Home?
You may be able to adjust a compatible model at home if its manual provides clear instructions and you have the correct tool. Turn the trimmer off, disconnect its power source, and follow the exact blade alignment steps. If the tool does not fit or you cannot confirm the blade position, have a trained professional do the work.
Q
Can a Zero Gapped Trimmer Cut the Skin?
Yes. A badly aligned blade can cut or scratch the skin, especially if the moving teeth extend beyond the fixed blade. Even a correctly adjusted trimmer can irritate skin if it is pressed too hard or used with poor technique. Stop using it if the blade scrapes, catches, or causes unexpected pain.
Q
Does Every BaBylissPRO Trimmer Include a Zero Gap Tool?
No. Included accessories vary by model and package. Some BaBylissPRO manuals describe a zero gap adjustment tool, but that does not mean every trimmer includes one or supports the same adjustment. Check the exact model manual and the listed package contents before buying a separate tool.
Q
Is a Zero Gap Setting Better Than the Factory Setting?
Not for every task. A close setting may help with crisp beard lines and hairline details, while the factory setting can be enough for routine trimming and may offer more room for error. Choose the setting that suits your work, skill, skin sensitivity, and the manufacturer’s instructions.
Q
Why Does My BaByliss Trimmer Pull Hair After Adjustment?
Hair pulling can result from trapped hair, dull or damaged teeth, incorrect blade alignment, or a blade that is not fitted securely. Switch off and disconnect the trimmer before inspecting it. Clean the blade and check the manual. If pulling continues, return to an approved setup or seek service instead of making repeated blind adjustments.
Q
How Often Should I Oil My BaBylissPRO Trimmer?
Follow the maintenance schedule in the manual for your exact model. Some BaBylissPRO instructions call for a few drops of blade oil before and after use, while other care details may vary. Use the recommended oil, wipe away excess, and keep parts dry when the manual says not to rinse them.
Q
Can I Use a Zero Gap Tool on Another Brand of Trimmer?
Do not assume that it will fit. Blade size, screw placement, and the way the tool holds the cutter can differ between brands and models. Use a tool only when the manufacturer or a reliable compatibility listing confirms that it suits the blade assembly.
✦ Wrapping Up
Conclusion
The BaByliss zero gap tool helps users set up compatible trimmer blades for closer detail work. It can be useful for barbers who shape hairlines, beards, and necklines, but the adjustment must be done with care. A closer setting is not always better, and a poor setup can cause cuts, scratches, or uneven cutting.
Start with the manual for your exact trimmer. Use the correct tool, loosen the screws only as directed, align the blades carefully, and secure the assembly before testing. Never use a trimmer if the moving blade extends beyond the fixed blade or if any part feels loose or damaged.
Clean and oil the blade as directed after use. If you are unsure about compatibility or cannot get an even alignment, ask an authorized service professional for help. A safe, well-maintained trimmer is more useful than a blade set too close for comfort.
💡 Key Takeaway
Before adjusting your BaBylissPRO trimmer, find the exact model number and read its zero gap instructions. Confirm tool compatibility, keep the moving blade behind the fixed blade, and stop if the teeth or screws appear damaged.