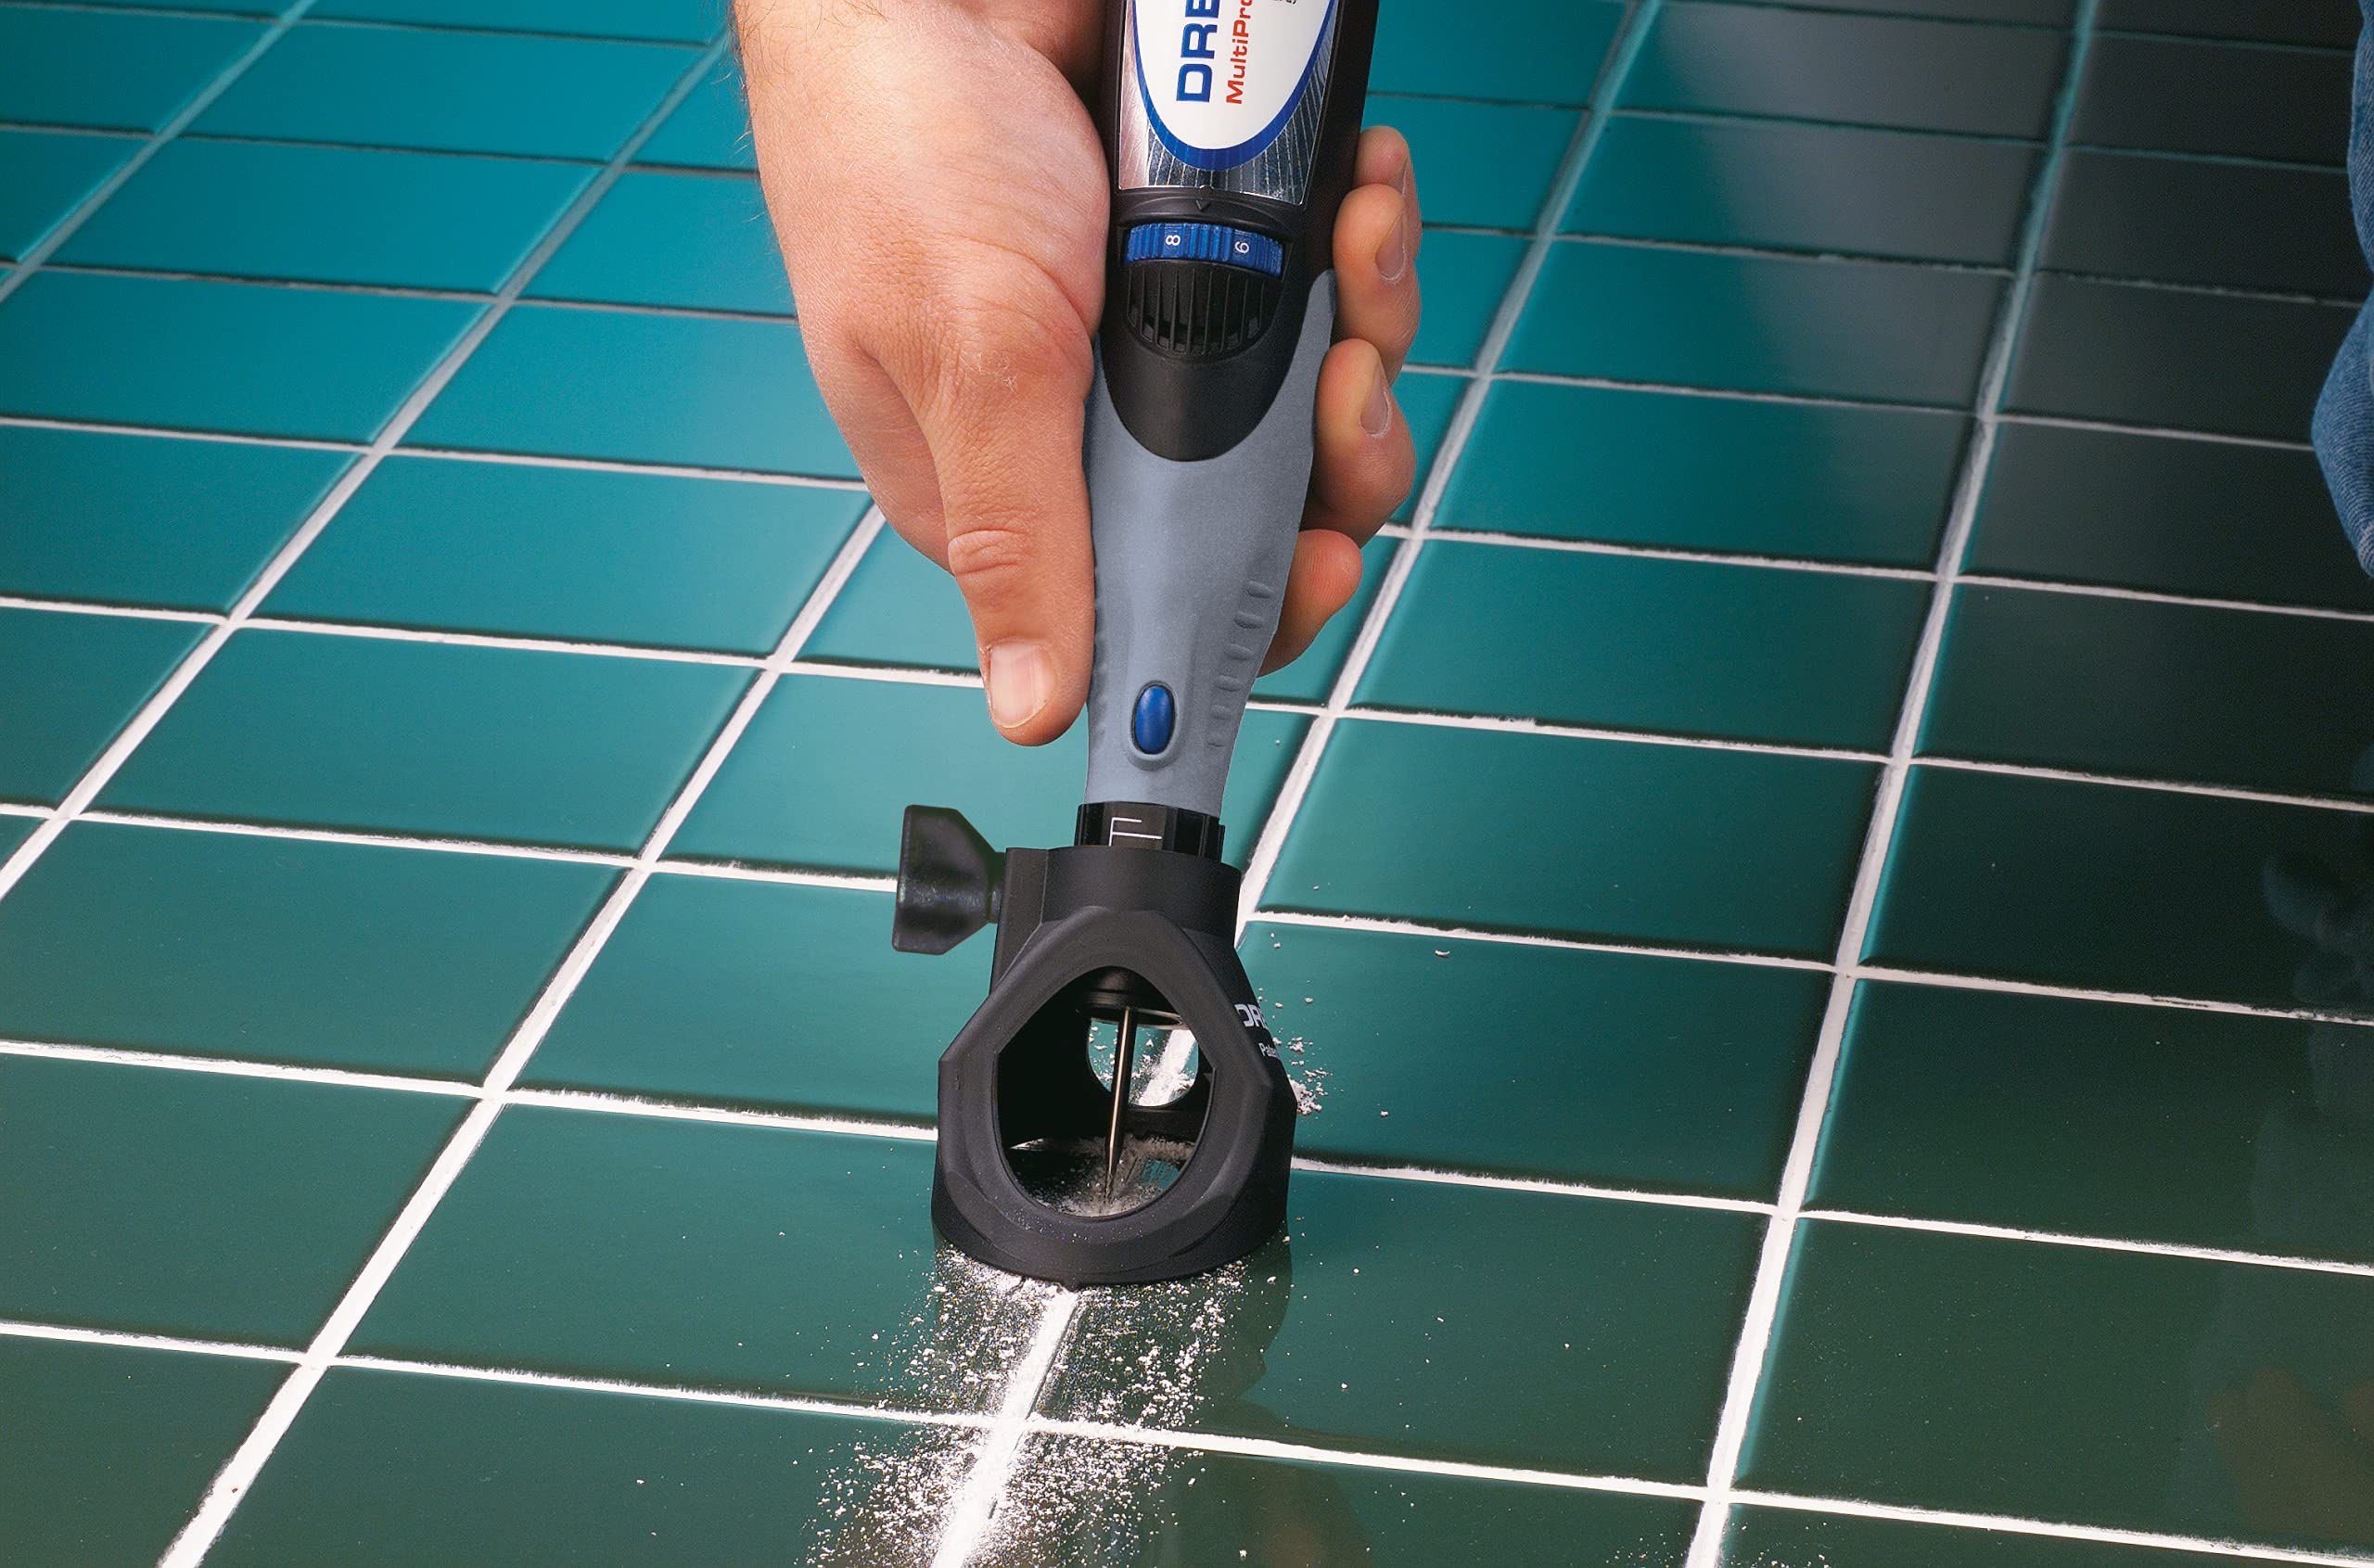
Yes, a Dremel rotary tool can remove old grout from tile joints. Use a compatible grout removal bit, work at a controlled speed, and keep the bit centered in the grout to avoid chipping the tile.
In American homes, worn grout often shows up around shower walls, bathroom floors, kitchen backsplashes, and tiled entryways. Cracked joints, loose grout, and dark stains can make sound tile look old. A Dremel rotary tool may help remove damaged grout without taking out every tile.
The key is to match the bit to the tool and the joint. Grout is the filler between tiles, while the tile edges are the surfaces you need to protect. A small rotary tool offers control in narrow areas, but it also removes material quickly if you press too hard or let the bit drift.
Before starting, check the tool manual and the grout accessory instructions. Wear eye protection and suitable respiratory protection, contain the dust, and keep the work area clear. Old tile jobs can involve unknown materials, so stop if you suspect asbestos or another hazardous substance.
Source: www.dremel.com
Can You Use a Dremel Tool to Remove Grout?
Yes, a Dremel rotary tool can remove grout from many ceramic and porcelain tile installations. The right accessory grinds or cuts the grout out of the joint. This can help with small repairs, stained joints, and grout that has cracked or started to break apart.
The tool works best when you can guide it along a clear joint and keep the bit away from the tile edges. Narrow joints demand extra care. A small slip can scratch a glazed tile, chip an edge, or leave a mark that is hard to hide.
A rotary tool is not the best choice for every job. Large floors with miles of grout lines may be faster to handle with a dedicated grout removal tool or an oscillating multi-tool fitted with a compatible grout blade. Hand tools can also make sense for a few short joints when dust or noise is a concern.
Source: YouTube
Good fit
Small repairs, short grout lines, and work in tight areas where a compact tool is easy to guide.
Less suitable
Very large tiled floors, fragile tile edges, deep joints near waterproofing, or work that needs extensive removal with tight dust controls.
Main limitation
The tool can remove grout quickly, but it cannot tell where the grout ends and the tile or hidden waterproof layer begins.
Rotary Tool vs. Oscillating Multi-Tool
A rotary tool spins a small bit at high speed. It suits short joints and detailed work when the user can maintain steady control. An oscillating multi-tool moves its blade back and forth, and a grout blade may offer better control across longer joints.
Neither tool is automatically safer for every tile. The result depends on the accessory, joint width, tile type, depth, and the operator’s control. Check the accessory maker’s instructions before fitting a blade or bit.
Choose a rotary tool
When the repair is small and a compact bit can fit the grout joint without touching the tile.
Consider an oscillating tool
When removing longer runs of grout and a compatible blade is available for the tool.
Choose a hand tool
When the job is tiny, power tools are not needed, or slower work gives you better control.
Which Dremel Bit Removes Grout?
Use a grout removal accessory that the manufacturer lists as compatible with your Dremel model. Dremel has offered grout removal accessories for selected rotary tools, including bits designed for work along tiled joints. Accessory names, sizes, and compatibility can vary by product and market.
Do not pick a bit by appearance alone. Check its part number, supported tool models, intended material, and required attachment. The bit must fit the joint while leaving enough clearance to protect both tile edges.
A narrow accessory can be useful for tight joints, but it may take more passes. A wider bit can remove material faster in a wide joint, yet it can also scrape or chip the tile if it does not fit. Never force a bit into a joint that is too narrow.
Source: housedigest.com
Confirm compatibility
Read the tool and accessory manuals to confirm that the bit fits the model and can be used for grout removal.
Match the joint width
Choose a cutting width that fits the grout line with room for careful control. Do not use the tile edges as guides.
Inspect the accessory
Do not use a bent, cracked, loose, or worn bit. Replace it when the manufacturer says it has reached the end of its useful life.
Fit it securely
Disconnect the tool from power or remove its battery before fitting the accessory, as the manual directs.
What About Dremel 568 and 569 Grout Accessories?
Dremel grout removal accessories have included the 568 attachment and 569 grout removal bit. These are product identifiers, not proof that every accessory fits every Dremel tool. Availability and supported models can change, so check current manufacturer information before buying or using one.
Some grout removal setups include a guide attachment to help control the tool along the joint. A guide may improve consistency, but it does not prevent all tile damage. Practice on an inconspicuous area and keep the bit aligned with the center of the grout line.
Before buying
Confirm the exact model number, compatible tool series, included parts, and joint-width guidance.
Before cutting
Make sure the guide and bit are fitted as instructed and that no part rubs against the tile.
Tools and Supplies to Prepare Before You Start
Gather the right tools before removing grout. A planned setup helps you keep the bit on course and reduces the chance of damage. You will also need a way to collect fine dust and clean the joint before applying new grout.
Read the instructions for the rotary tool, grout accessory, dust control equipment, and replacement grout. Product labels matter because grout types differ, and the right cleanup or curing method depends on the product you choose.
Source: vsanalysis.com
Dremel rotary tool and compatible grout bit
Use a model and accessory combination approved by the manufacturer for the task.
Eye protection
Wear safety glasses or goggles that protect against flying chips and dust.
Respiratory protection
Use a properly fitted respirator suitable for the dust hazard. Ordinary fabric masks are not a reliable substitute for suitable protection.
Dust collection
Use suitable dust extraction or another method specified for the tool and material. Avoid spreading fine dust through the home.
Lighting and hand tools
Use bright work lighting and a small grout scraper or brush for controlled cleanup where needed.
Replacement grout and application tools
Choose a grout suitable for the tile, joint width, and wet or dry location. Have the required float, sponge, and mixing supplies ready.
Check the Tile and the Joint First
Identify the tile surface before you begin. Glazed ceramic, porcelain, natural stone, glass tile, and decorative tile can react differently to accidental contact with a cutting bit. Natural stone may scratch or chip, while a glossy glaze can show marks at once.
Check whether the joint contains grout or flexible sealant. Corners, changes of plane, and many joints around tubs or shower trays often need suitable flexible sealant rather than rigid grout. Removing the wrong material and filling it with grout can lead to another failure.
Stop for loose tiles
A tile that moves or sounds hollow may need repair before the joints are renewed.
Check for water damage
Persistent dampness, leaks, soft backing, or recurring mold may point to a problem beyond the grout surface.
Pause for unknown old materials
Do not grind material that may contain asbestos or another hazardous substance. Arrange appropriate testing or professional assessment first.
How to Remove Grout With a Dremel Tool
Work in short sections and keep the bit in the center of the joint. The aim is to remove the failed grout, not to cut into the tile or the material behind it. Slow, controlled passes give you more chances to spot a problem before it spreads.
Source: www.dremel.com
Step 1: Prepare the Room
Move loose items, towels, rugs, and small objects away from the work area. Cover nearby surfaces as needed, and keep children and pets out of the space. If you are working in a bathroom, keep water away from the tool and follow the tool maker’s electrical safety instructions.
Set up dust collection before cutting. Close off the work area where practical, but do not block needed ventilation or create an unsafe breathing space. Wear eye protection and the appropriate fitted respirator before making dust.
Secure the area
Remove trip hazards and make sure the tile surface is stable and well lit.
Plan the dust control
Place the collection equipment close to the cutting point when its instructions allow this setup.
Step 2: Fit the Correct Bit
Turn the tool off and disconnect its power source before fitting the bit. Follow the manual to install the accessory and any compatible guide attachment. Tighten the fitting as directed without forcing parts together.
Check the bit alignment before switching the tool on. If the accessory looks off-center, feels loose, or does not match the joint, stop and correct the setup.
Check the fit
The bit should enter the grout joint without scraping either tile edge.
Check the guide
If a guide is supplied, set it according to the accessory instructions rather than guessing at the depth.
Step 3: Test on a Small Area
Start with a short, less visible section of grout. Use the speed and method specified by the tool and accessory instructions. Keep both hands in a stable position if the manual calls for it, and avoid leaning your body over the bit.
Watch the tile edges as you work. If the bit wanders, chatters, or makes the tile vibrate, stop and check the setup. Do not try to correct a bad angle by pushing harder.
Look for clean grout removal
The bit should remove material from the joint without leaving fresh scratches or chips on the tile.
Adjust before continuing
If control is poor, review the bit size, guide position, speed instructions, and joint width.
Step 4: Move Along the Grout Line
Guide the tool along the joint in short, steady passes. Keep the bit centered and let the accessory do the work. Avoid long sweeping movements that make it harder to stay within the joint.
Do not force the bit deep into the grout. The safe removal depth depends on the joint, the tile assembly, and the new grout manufacturer’s requirements. Stop before you risk cutting into a membrane, backer material, or other hidden layer.
At intersections and near tile corners, slow down and use extra care. These spots are easy to overcut because several grout lines meet in a small space.
Keep the tool steady
Follow the center of the grout joint instead of using the tile edge as a guide.
Use light pressure
Heavy pressure can cause the bit to wander, overheat, or damage the tile.
Stop when needed
Turn the tool off before clearing debris, changing position, or inspecting the accessory.
Step 5: Remove Loose Debris
After each short section, switch off the tool and inspect the joint. Remove loose fragments with a suitable hand tool or brush, taking care not to scratch the tile. Use dust collection equipment that is appropriate for the material and task.
Do not blow the dust away with compressed air. That can spread fine particles across the room and into the air you breathe. Avoid dry sweeping methods that send dust back into the work area.
Inspect the joint
Look for remaining loose grout, uneven spots, tile damage, or signs that the cut is becoming too deep.
Keep dust contained
Clean using a method suited to the dust hazard and the tile surface.
Step 6: Clean and Check Before Regrouting
Remove the remaining loose particles from the joint and follow the new grout manufacturer’s preparation instructions. The joint must be clean and ready for the chosen grout. Do not leave powder, loose chips, or soft material where fresh grout needs to bond.
Check that the tile edges remain sound and that you have not cut into the backing or waterproofing. If you see damage, stop and assess it before applying new material. In a shower or other wet area, damage to the waterproof layer may require a repair beyond regrouting.
Apply the replacement grout according to its label. Follow the required mixing ratio, working time, cleanup steps, and cure time. Keep the area dry or unused for the period stated by the manufacturer.
Confirm the joint is ready
The joint should be free of loose material and meet the depth and preparation requirements for the new grout.
Use the correct fill
Choose grout or flexible sealant based on the location and joint function.
Respect cure time
Do not expose the new grout to water or heavy use before the product instructions allow it.
How Deep Should You Remove the Old Grout?
Remove enough old grout to meet the instructions for the replacement grout, while keeping the tile edges and hidden layers intact. There is no single depth that fits every tile joint or grout product. Joint size, existing grout condition, and the new product all affect the amount that must come out.
Removing only a thin layer may leave weak material beneath the repair. Removing too much can damage the tile bed or waterproofing, especially on a shower wall or floor. If you cannot see where the old joint ends or how deep the assembly is, do not keep cutting just to make the groove look deeper.
Check the product data for the grout you plan to use before starting. Some repairs need more removal than others, and the manufacturer’s instructions should guide the final joint preparation.
Source: rona.ca
When the grout is loose
Remove loose and failing material until the remaining joint is sound and meets the replacement product’s preparation requirements.
When grout is only stained
Try an appropriate grout cleaner first if the material is intact. Color change alone does not always require removal.
When the joint is very shallow
Do not force a rotary bit into the tile edges. Review the grout requirements and consider a hand tool or professional help.
Signs That You Have Removed Enough
The joint is ready when loose and failed grout has been removed, the remaining material is sound, and the groove meets the new product’s preparation requirements. There should be no fresh tile chips or signs of damage to the backing.
A clean-looking groove is not proof that the waterproofing beneath a shower remains intact. If the tool has cut below the grout bed or exposed an unexpected layer, stop and assess the installation before continuing.
Good sign
The remaining grout is firm, loose debris is gone, and the joint meets the product instructions.
Warning sign
The tile edge chips, the tile moves, the backing appears, or the bit reaches an unknown layer.
How to Avoid Chipping or Scratching Tile
The best way to protect tile is to prevent the bit from touching it. Center the accessory, work slowly, and stop as soon as control becomes uncertain. A grout removal guide may help, but careful technique remains necessary.
Glazed ceramic and porcelain can show scratches or chips when a cutting accessory slips. Natural stone may need extra care because its surface can be scratched or dulled. Test the setup in a hidden area before moving to a visible section.
Source: desertcart.pe
Use the right width
A bit that nearly fills the joint may leave little room for error. Select an accessory suited to the actual joint width.
Avoid sideways force
Do not twist the tool to widen the groove. Stop and reassess if the bit cannot move freely within the joint.
Keep a firm grip
Set your hands and body before the tool touches the grout. Avoid awkward positions that make the bit hard to control.
Inspect often
Pause between short passes to check the tile edges, accessory, and cutting depth.
What If the Bit Keeps Wandering?
A wandering bit can mean that the joint is too narrow, the accessory is not fitted correctly, or the tool is being pushed at an angle. A worn or damaged bit can also make control harder. Turn the tool off before checking the fit or replacing the accessory.
Do not solve wandering by adding pressure. Verify compatibility, use the correct guide if available, and consider a hand grout saw or another suitable tool if the rotary tool cannot stay within the joint.
Recheck the accessory
Confirm that the bit is secure, straight, and approved for your model.
Reassess the joint
If the bit is too large for the grout line, stop and choose a suitable alternative.
Dust, Noise, and Other Safety Concerns
Grout removal creates fine dust and flying particles. The dust can irritate your eyes and airways, and its contents depend on the materials being cut. Some masonry and tile materials contain crystalline silica, which can cause serious lung disease when respirable dust is inhaled over time.
Do not treat a small home repair as dust-free work. Use a dust-control method suited to the tool and material, wear eye protection and an appropriate fitted respirator, and follow the relevant product and workplace safety instructions. A household vacuum is not automatically suitable for collecting hazardous fine dust.
Older homes and old tile assemblies can contain materials that should not be ground without assessment. If the age or makeup of a floor, adhesive, backing, or coating raises concern about asbestos, stop before disturbing it. Have the material assessed by a qualified professional.
Source: snapklik.com
Protect your eyes
Wear suitable safety glasses or goggles to guard against flying chips.
Protect your lungs
Use a properly fitted respirator selected for the hazard. Facial hair or a poor fit can reduce protection for tight-fitting models.
Control dust at the source
Use suitable extraction or a manufacturer-approved dust-control method instead of allowing dust to spread through the house.
Keep the area clear
Keep bystanders away and clean the work area with a method suitable for the material.
Stop for suspect materials
Do not cut or grind materials that may contain asbestos until they have been assessed and the proper work plan is in place.
Can You Remove Grout Without Making Dust?
Powered grout removal usually creates dust or debris, so it is not realistic to promise a completely dust-free process. The practical goal is to reduce dust at the cutting point and prevent it from spreading into nearby rooms.
Use extraction equipment rated and suited to the material, following its instructions. Do not add water to a powered tool unless the tool and accessory are expressly designed for wet use. An improvised wet method can create an electrical hazard or damage the equipment.
Use approved controls
Follow the tool maker’s dust-control guidance and any applicable safety requirements.
Do not improvise wet cutting
Only use water when the equipment and procedure are designed for it.
Common Problems and How to Fix Them
When grout removal goes poorly, stop the tool before trying to fix the problem. Continuing to cut through a jam, loose bit, or damaged tile can make a small issue much worse. Check the accessory, joint, and dust setup before resuming.
Source: vsanalysis.com
The bit will not fit the joint
Do not force it in. Confirm the joint width and use a compatible, narrower accessory or a suitable hand tool.
The tile edge starts chipping
Stop immediately. Check the bit alignment, pressure, and guide. Change tools or seek help if you cannot maintain clearance.
The bit clogs or cuts poorly
Turn the tool off and disconnect its power source before inspecting it. Clean or replace the accessory as directed by the manufacturer.
Dust spreads across the room
Stop cutting, let airborne dust settle as appropriate, and review the collection setup and protective equipment before continuing.
The grout comes out in chunks
This may indicate failed grout, but check that the tile is firmly set. Loose tile or movement can mean the repair needs more than new grout.
The new grout cracks again
Look for movement, loose tile, water damage, or a joint that should use flexible sealant. Replacing the surface alone may not address the cause.
When to Stop and Call a Tile Professional
Get professional help if tiles move, the backing is damaged, a shower may have lost waterproofing, or cracks return after repair. The same applies when you cannot identify the material under the grout or safely control the tool.
A professional can assess whether the problem is limited to the grout or involves the tile bed, substrate, or waterproof layer. That distinction matters because new grout cannot fix a leaking pipe, unstable tile, or damaged waterproofing.
Hidden water damage
Persistent dampness, leaks, or damaged wall and floor materials need a cause-based assessment.
Large or complex areas
Extensive removal may call for different tools, dust controls, and a planned repair method.
Potential hazardous material
Arrange appropriate assessment before disturbing unknown old materials.
Dremel Tool vs. Other Grout Removal Methods
The best grout removal method depends on the size of the job, the tile material, the width of the joint, and how much control you need. A compact rotary tool is useful for detailed work, while a hand tool can suit a few short joints. A compatible oscillating blade may make more sense for longer runs.
No tool removes the need to protect the tile and control dust. Before choosing, consider how easy the tool is to guide, whether a compatible accessory exists, and whether you can keep the cut away from hidden layers.
Source: www.dremel.com
Dremel rotary tool
Useful for short runs and detailed work. It requires a compatible bit and steady control.
Manual grout saw
Useful for small repairs and slower, controlled removal. It takes more physical effort and may be less practical for a large floor.
Oscillating multi-tool
Useful for longer joints when a compatible grout blade is available. Blade width and control still matter.
Dedicated grout removal tool
May suit larger jobs or repeated use. Check the tool’s intended materials, dust controls, and accessory compatibility.
Which Method Makes Sense for Your Project?
For a few damaged joints around a backsplash, a rotary tool or manual grout saw may be enough. For a long bathroom floor, a compatible oscillating tool may reduce the time spent moving from one joint to the next. For delicate tile or uncertain joint depth, slower manual work may offer better control.
These are practical starting points, not guarantees. If the grout sits next to fragile tile or a waterproofing layer is at risk, choose the method you can control safely or ask a qualified tile professional to assess the job.
Small repair
Start by comparing a Dremel rotary tool with a manual grout saw.
Long grout lines
Consider an oscillating multi-tool or dedicated grout removal tool with a compatible accessory.
Fragile tile or unknown backing
Avoid aggressive powered cutting until the materials and safe removal depth are clear.
Preparing the Joint for New Grout
After removing the old grout, the next step is to create a clean, sound joint that meets the new grout’s requirements. Do not rush straight from cutting to filling. Fine dust and loose chips can interfere with the repair, and dampness or hidden damage may need attention first.
Use the cleaning method specified for the tile and grout product. Avoid harsh tools or chemicals that can damage the tile finish or leave residue. Let the joint reach the condition required by the new product before application.
Source: vsanalysis.com
Choose Grout or Flexible Sealant
Use grout for joints designed to be filled with grout. Use a compatible flexible sealant where the tile system requires movement accommodation, such as many changes of plane or joints between tile and a tub. The correct choice depends on the installation and product instructions.
Do not fill every joint with the same material just because it looks similar. Rigid grout can crack in a joint that needs flexibility. If you are unsure whether a joint is a grout line or a movement joint, check the tile installation guidance or consult a professional.
Match the material
Choose grout or sealant based on the joint’s function and the tile installation instructions.
Follow the product label
Use the stated mixing, application, cleanup, and curing steps.
Check the cause
If grout failed because of movement or water damage, repair that issue before refilling the joint.
How to Tell Whether Regrouting Is Enough
Regrouting may be enough when the tiles are firmly set, the backing is sound, and the problem is limited to damaged grout. It is not a complete repair for loose tiles, failed waterproofing, leaking plumbing, or a moving substrate.
If cracks return quickly or dampness persists, do not keep replacing the grout without finding the cause. A surface repair lasts only when the joint and tile assembly are sound.
Regrouting may work
The tiles are stable, the joint is clean, and the damage is limited to the grout.
Further repair may be needed
Tiles move, cracks recur, water gets behind the tile, or the substrate appears damaged.
Frequently Asked Questions
Q
Can a Dremel remove grout without damaging tile?
It can remove grout with limited tile damage when the accessory fits the joint and the operator maintains control. However, no rotary tool can guarantee damage-free removal. Use light pressure, keep the bit centered, and stop if it touches or chips the tile.
Q
What speed should I use to remove grout with a Dremel?
Use the speed range and method stated in the manuals for your exact tool and grout accessory. There is no single setting that is right for every bit, joint, and tile type. Start cautiously in a test area and adjust only within the manufacturer’s guidance.
Q
Can I use a regular Dremel cutting wheel to remove grout?
Do not assume a standard cutting wheel is suitable for grout removal. Use an accessory specifically approved for the task and compatible with your tool. A wheel that is too wide or designed for another material can damage tile or create an unsafe setup.
Q
Do I need to remove all the old grout?
Not always, but loose or failed grout must be removed to the condition required by the replacement product. A thin layer of weak grout can undermine the repair, while excessive cutting can damage the tile bed or waterproofing. Follow the new grout manufacturer’s preparation instructions.
Q
Can I use a Dremel to remove grout in a shower?
Yes, in some shower repairs, but extra care is needed because the assembly may contain a waterproof membrane behind the tile. Do not cut deeply without knowing the joint and backing construction. If you expose a membrane, find a leak, or suspect water damage, stop and arrange a proper assessment.
Q
Is a Dremel better than a manual grout saw?
A Dremel may be quicker for some small repairs, while a manual grout saw offers slower, direct control and avoids powered cutting. The better choice depends on the joint, tile, amount of grout, and your ability to keep the tool on course. For long runs, an appropriate oscillating tool may also be worth considering.
Q
Can I grout right after removing the old grout?
Only after the joint has been cleaned and prepared according to the new grout manufacturer’s instructions. Remove loose particles and dust, check for damage, and confirm that the joint meets the product’s depth and moisture requirements. Follow the stated cure time before exposing the repair to water or heavy use.
✦ Wrapping Up
Conclusion
A Dremel tool can be a useful way to remove old grout from short tile joints and small repair areas. The most important steps are choosing a compatible grout bit, keeping it centered, using controlled passes, and limiting dust. Protecting the tile and hidden backing matters more than finishing the job quickly.
Before regrouting, make sure the remaining joint is sound and ready for the replacement product. Use flexible sealant where the joint calls for it, and investigate recurring cracks, loose tiles, or signs of water damage. Stop if the material is unknown or the waterproofing may be at risk.
💡 Key Takeaway
Check your Dremel model and grout accessory instructions, test on a small area, and remove only the grout you can reach safely without damaging the tile or backing.