The main Hardie Plank siding installation tools are a tape measure, level, chalk line, siding gauge, fiber cement shears or a dust-controlled circular saw, a suitable drill or nail gun, approved fasteners, and personal safety gear. The right setup helps you cut clean edges, keep each plank level, and attach the siding as the manufacturer requires.
Across the United States, fiber cement siding is used on homes in many climates, from humid areas in the Southeast to cold regions in the Northeast and dry parts of the West. Hardie Plank lap siding is one product homeowners may consider when updating an exterior. A good result depends on more than the boards themselves. The tools, wall prep, fastening method, and local building rules all play a part.
You do not need every tool sold for siding work. A small repair may call for basic measuring tools and hand tools, while a full house needs a safe cutting station, reliable dust control, and a way to handle long, heavy planks. Start with the current James Hardie installation guide for your product and climate zone. Then choose tools that match the plank thickness, cut type, wall design, and work area. Fiber cement can release harmful silica dust when cut, so plan for dust control before the first cut.
Measuring and layout tools help keep each plank straight and each cut in the right place. Even a good saw cannot fix a row that starts too high or a wall that is out of line. Set up your marks before lifting the siding into place.
A basic layout kit works for small projects and larger jobs alike. Check your measurements twice, especially around windows, doors, corners, and roof lines. Small errors can grow as the rows move across a wall.
Source: m.media-amazon.com
Tape measure
Use a sturdy tape to measure wall sections, plank lengths, openings, and gaps. A model with clear markings makes it easier to read measurements in bright outdoor light.
Chalk line
Snap a clear reference line to mark the starting course and other layout points. Check that the line matches the planned installation height before fastening the first board.
Level
A long level helps check the starter course and confirm that rows remain level. A laser level may also help on long walls, but it does not replace checks against the actual wall and product instructions.
Carpenter’s square
Use a square to mark straight crosscuts and check corners. It can help you spot an angled cut before you take the board to the saw.
Pencil and straightedge
Mark cut lines with a visible pencil and use a straightedge when needed. Keep marks clear without damaging the finished face of prefinished siding.
How to Lay Out the First Course
Begin with the wall preparation and starter details listed in the installation guide. Mark the required starting height, then check the line from one end of the wall to the other. Do not use a floor, driveway, or rough foundation edge as your only level reference.
Place a short test piece against the planned layout if you need to check the fit near a corner or opening. Make sure the planned course leaves the correct clearances and allows the required overlap. Fix layout errors before installing a full row.
Check the whole wall
Look for uneven sheathing, bowed framing, or changes in the wall plane. Correct problems before siding hides them.
Mark openings early
Measure window and door positions before cutting planks. This reduces wasted material and helps avoid narrow or awkward pieces.
2. Cutting Tools for Hardie Plank Siding
Cutting tools need to match fiber cement, the board thickness, and the shape of the cut. The two main options for lap siding are fiber cement shears and a compatible circular saw with suitable dust control. Each has a place on a siding job.
The current James Hardie instructions should guide your choice. Product types differ, and a tool that works for one board may not suit another. Never choose a blade only because its diameter or tooth count looks right.
Source: i.pinimg.com
Fiber cement shears
Manual, electric, or pneumatic shears can make many straight and shaped cuts with less airborne dust than a power saw. Check the shear capacity and the siding thickness before use. Shears are not suitable for every trim product or cut.
Circular saw
A compatible circular saw is useful when many planks need to be cut to length. Use a fiber cement blade approved for the saw and material, along with the required dust collection system. Operate it outdoors in a well-ventilated cutting area.
Power miter saw
A miter saw can help make repeatable crosscuts when the work setup and blade are suitable. It still needs effective dust control and must be used according to the saw and siding instructions.
Score-and-snap tool
A suitable scoring method may work for some thin fiber cement products and straight cuts. Check the product instructions first, because this method is not appropriate for every thickness or board type.
Utility knife
A utility knife is useful for marking, trimming suitable materials, and cutting weather barrier products. Do not treat it as a replacement for a proper fiber cement cutting tool.
How to Choose Between Shears and a Saw
Shears are worth considering when you want to limit dust at the cutting point and the tool can handle the board. A saw may be more practical for a high volume of straight cuts, but it needs a proper blade and dust collection setup. The lowest-cost tool is not always the lowest-cost choice once setup, cleanup, and safe work are considered.
For power sawing, set the cutting station outdoors where airflow carries dust away from workers, family members, and nearby homes. Follow the saw maker’s instructions for the blade guard and vacuum connection. Do not use a high-speed power saw indoors or in a poorly ventilated area to cut these products.
For a few cuts
Suitable shears may be a practical choice when the product thickness is within the tool’s rated range.
For repeated cuts
A compatible saw and dust collection system can make repeated crosscuts easier to manage.
For detailed cuts
Check the product’s permitted cutting methods and use the right tool for notches, openings, and trim details.
Why the Saw Blade Matters
Fiber cement contains crystalline silica. Cutting it with an unsuitable blade can create fine dust that may enter the lungs. Use a blade designed for fiber cement, follow its speed rating, and replace it when it is worn or damaged.
A masonry blade or a standard wood blade is not an automatic substitute for a fiber cement blade. Check the saw manual and blade label before use. If the blade, saw, or dust collector is not compatible, stop and find a suitable setup.
Inspect the blade
Look for damage, missing teeth, or other wear before cutting. Disconnect power before changing a blade or adjusting the saw.
Check dust collection
Keep the shroud and hose in place, clear any blockages, and use the filter and airflow required by the equipment instructions and applicable safety rules.
3. Siding Gauges, Clamps, and Support Tools
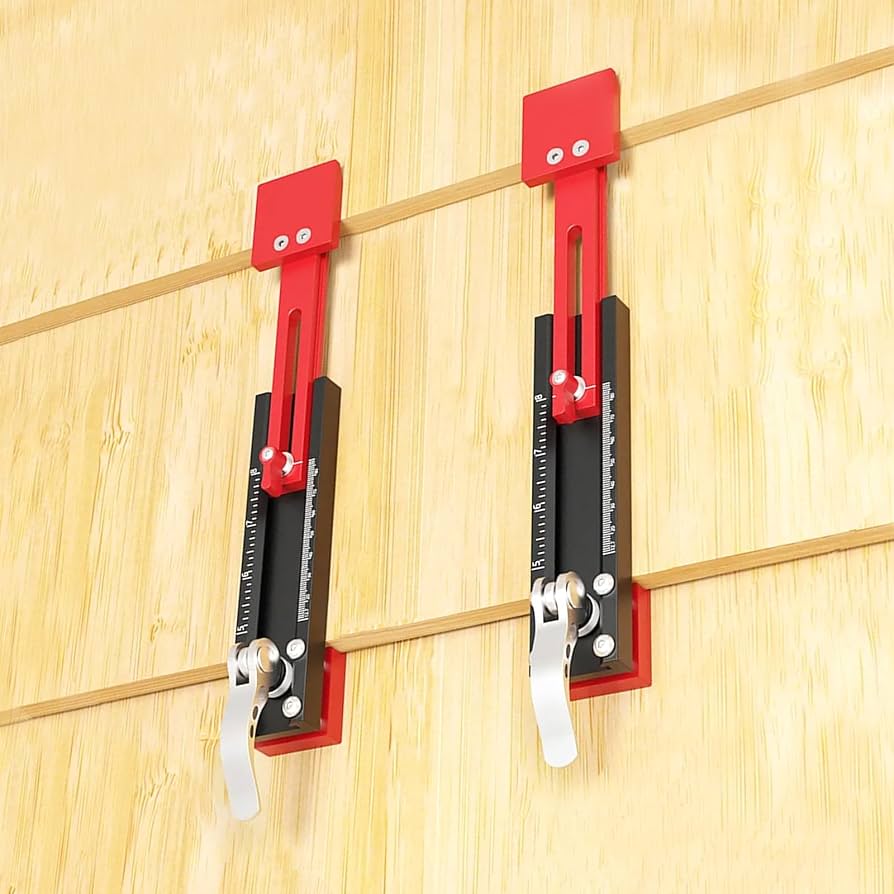
Siding gauges and compatible installation clamps help hold lap siding at a repeatable exposure while you fasten it. Exposure is the amount of each plank left visible after the next course overlaps it. A consistent exposure helps the finished wall look straight and even.
These tools can make installation easier, but they do not set the rules for the job. Use the exposure and fastening pattern stated in the instructions for your exact product. Do not assume that a gauge made for one plank thickness fits every Hardie product.
Source: m.media-amazon.com
Lap siding gauge
A gauge supports repeatable spacing between courses. Confirm that it suits the plank thickness and intended exposure before buying or using it.
Siding clamps or hangers
Some systems hold a plank temporarily while the installer positions and fastens it. Check the tool’s load rating, material compatibility, and instructions. Remove or reposition it as directed.
Starter strip
The correct starter detail helps establish the lower edge and angle of the first course. Use the type and dimensions required by the installation guide.
Work supports
Stable saw horses or a suitable cutting bench support boards during cutting. Set them on firm ground and keep the plank from rocking or slipping.
Are Hardie Plank Siding Gauges Required?
A gauge is often a convenience rather than a universal requirement. An installer may use one to hold the planned exposure while fastening a row, or may follow a different method allowed by the manufacturer’s instructions. The key is to keep the course spacing consistent without damaging the plank.
Before using a clamp or hanger, check that it does not chip the lower edge or damage a finished surface. Some accessories are designed for certain thicknesses, and the wrong size can lead to poor support or an incorrect lap.
Match the thickness
Read the tool’s stated range and compare it with the exact siding product.
Test before full use
Try the tool on a spare piece and inspect the edge for marks or chips.
4. Fastening Tools, Nails, and Screws
Fastening tools secure the planks to the approved wall support. The right nail or screw depends on the product, framing, sheathing, exposure conditions, and local code. Read the fastening section of the current guide before choosing a nail gun or buying a box of fasteners.
A pneumatic nail gun can speed up a large siding job, while a hammer may suit some permitted tasks. A drill or driver may be needed for approved screw fastening or other details. Use only the fastening method specified for the application, and avoid driving fasteners too deep.
Source: m.media-amazon.com
Pneumatic nail gun
A siding nailer can help install many planks at a steady pace. Set the pressure and depth according to the tool and siding instructions, then check the first fasteners before continuing.
Hammer
A hammer may be useful for approved hand-nailing tasks and small repairs. Use the fastener type and placement required by the product guide.
Drill and driver
These tools may be used where the approved design calls for screws or pilot holes. Select the correct bit and driver setting, and avoid using an unapproved fastening pattern.
Approved fasteners
Use nails or screws with the specified type, size, corrosion resistance, and penetration. Exterior exposure and the wall’s framing can affect the correct choice.
How to Check Fastener Depth
A fastener that sits too proud may interfere with the next course or fail to hold the plank as intended. A fastener driven too deep may damage the siding face or reduce the intended holding strength. Check the required finish and fastening position in the installation guide.
Make a short test run on a suitable work area before fastening an entire wall. Inspect the fastener heads and the siding surface. Adjust the tool only after following its manual and the product instructions.
If nails stand out
Stop and check the tool setting, air pressure, nail type, and the material behind the plank. Do not simply raise the pressure without checking the cause.
If the face breaks
Check for excessive drive depth, incorrect fastener placement, or an unsuitable fastener. Replace damaged material as required rather than hiding the problem.
5. Safety Gear and Silica Dust Control
Dust control is a core part of a safe fiber cement siding job, not an optional cleanup step. Cutting, drilling, sanding, or grinding fiber cement can release respirable crystalline silica. Breathing this fine dust can cause serious lung disease, including silicosis.
Use cutting methods that create less dust where practical. For power sawing, use a suitable dust-reducing saw setup and collection system in the conditions required by the manufacturer and applicable OSHA rules. Keep people who are not involved in the work away from the cutting area.
Source: images.bannerbear.com
Safety glasses
Protect your eyes from chips and debris. Use eye protection that fits well and is suitable for the cutting or fastening task.
Hearing protection
Use suitable earplugs or earmuffs when the saw, nailer, or other equipment creates hazardous noise.
Respiratory protection
Choose a properly fitted respirator according to the task, exposure controls, product guidance, and applicable rules. A loose dust mask is not a substitute for a required respirator program.
Work gloves
Use gloves that help protect your hands while carrying and handling boards. Keep gloves, clothing, and hands clear of moving blades and other pinch points.
Dust collection equipment
Use a compatible saw shroud, hose, vacuum, and filter system. Maintain the setup as directed, and do not let a full bag or blocked filter reduce its performance.
How to Clean Up Fiber Cement Dust
Do not dry sweep fine fiber cement dust or blow it around with compressed air. These methods can send dust back into the air. Follow the product safety instructions and use a suitable HEPA vacuum or wet cleanup method where permitted.
Keep the cutting station outdoors and arrange it so the wind carries dust away from workers and other people. Never assume that a short cut is harmless. If you are unsure which controls are required for the job, consult OSHA guidance or a qualified safety professional before proceeding.
Before cutting
Inspect the saw, blade, shroud, hose, vacuum, and work supports. Clear the work area and warn others nearby.
After cutting
Switch off the equipment and collect debris using an approved method. Follow the equipment instructions when emptying the vacuum or changing filters.
6. Tools for Wall Preparation and Moisture Control
A sound wall is just as important as the siding tools. Before installation, check the sheathing, framing, water-resistive barrier, flashing, and opening details. Hardie Plank siding is an exterior cladding product, not a fix for hidden leaks or damaged framing.
The exact wall assembly depends on the building design, local code, and the current installation instructions. Keep the drainage plane intact and seal or flash penetrations as required. If you find rot, active leaks, mold, or damaged framing, address the cause before covering the area.
Source: m.media-amazon.com
Pry bar
A pry bar can help remove old siding and trim during a replacement project. Work carefully around the wall so you do not damage sheathing, flashing, or wiring hidden behind the cladding.
Utility knife and shears
Use suitable hand tools to trim weather barrier materials and tape. Follow the barrier maker’s instructions for seams, corners, and openings.
Flashing tools
Snips, a tape measure, and approved sealant tools may be needed for flashing details. Use the material and overlap required by the wall design.
Stud finder or framing marks
These can help locate framing when needed, but verify the wall construction and fastening requirements before relying on a reading.
Ladder or scaffold
Use stable access equipment rated for the load and height. A large siding plank can catch the wind, so plan how it will be carried and held before working above ground.
What to Check Before the First Plank
Make sure the wall surface is suitable for the specified installation. Uneven sheathing or framing can show through the finished siding, so correct irregularities first. Confirm the starter detail, corner treatment, flashing, and opening clearances.
Store siding flat, dry, and protected before installation, following the product instructions. Carry boards carefully and protect their edges and corners. Damaged or wet material may be harder to handle and can affect the final result.
Inspect the water barrier
Check for tears, open seams, and poorly treated openings. Repair these details with compatible materials before installing the siding.
Plan the cut list
Measure each wall and opening, then group repeat cuts where practical. This can reduce waste and limit the number of cuts made on site.
7. Essential Tools Compared by Job Type
The best tool list depends on whether you are replacing one plank, siding a small shed, or covering an entire house. Buying a full contractor setup for one repair may not make sense. Renting a suitable saw or hiring a siding crew may be more practical for a large or complex project.
Use the table below as a planning guide, not a substitute for the product manual. Every cutting and fastening tool still needs to match the siding and work conditions.
Source: m.media-amazon.com
Small repair
Focus on measuring tools, a suitable cutting method, approved fasteners, safety gear, and careful removal tools.
Small building
Add a stable cutting station, suitable siding gauge, repeatable measuring setup, and dust collection where power sawing is used.
Whole-house project
Plan for efficient cutting, safe material handling, compatible fastening equipment, access gear, waste control, and enough trained help.
Basic Tool Planning Table
This table separates the core tools from items that depend on the work. Check the current installation guide to confirm the exact requirements for the product and wall assembly.
Measuring and layout
Tape measure, level, chalk line, square, and pencil. These are useful for nearly every installation.
Cutting
Suitable fiber cement shears or a compatible circular saw and dust collection system. Choose based on thickness, cut type, and safe work conditions.
Fastening
Approved nailer or hand tools, compatible nails or screws, and a means to check fastener placement and depth.
Positioning
A compatible siding gauge or clamp may help hold exposure and support a plank during fastening.
Safety and access
Eye protection, hearing protection, suitable respiratory controls, stable supports, and rated ladders or scaffolds when needed.
How to Keep Tool Costs Under Control
Start by listing the tools you already own and checking whether they are rated for the task. A standard circular saw may need a compatible blade and dust collection setup before it can be used for fiber cement. A nail gun may also need a different setting or approved fastener type.
Rent tools that are costly and unlikely to see regular use, but inspect them before starting. Make sure the blade, guard, dust port, hoses, and accessories are included and in good condition. Never save money by skipping dust control or using a tool that the product maker does not approve.
Buy core hand tools
Measuring and layout tools are useful for many home repair jobs, so they may be worth owning.
Rent specialty equipment
A suitable siding saw or access system may be rented when a project needs it for only a short time.
Do not buy by name alone
Check the exact tool dimensions, supported thickness, blade type, and compatibility before placing an order.
8. Common Installation Problems and How to Fix Them
Most siding problems become easier to manage when you stop and find the cause early. A crooked row, chipped edge, or poorly seated fastener should be checked before the next course covers it. Do not try to hide a defect with caulk or paint unless the product instructions allow that repair.
Inspect each row as you work. Look at the exposure, butt joints, fastener placement, and the condition of the board edges. Correct errors while the affected pieces are still easy to reach.
Source: images.bannerbear.com
Uneven rows
Check the first course, chalk line, and gauge placement. If the wall or starter detail is out of line, fix the underlying issue before adding more boards.
Chipped plank edges
Inspect the blade or shear, support the board well, and use the permitted cutting method. Handle planks carefully to avoid damage during carrying and positioning.
Fasteners sitting too deep
Check the tool setting, pressure, and approved fastener. Replace or repair damaged siding according to the product instructions.
Visible dust around the saw
Stop cutting and inspect the collection shroud, hose, filter, and vacuum operation. Restore effective dust control before continuing.
Gaps around openings
Check the required clearances, flashing, and sealant details. Do not fill every gap by default, because some joints require a specific drainage or movement detail.
When to Call a Siding Professional
Hire a qualified siding contractor when the job involves extensive rot, complex roof-to-wall transitions, difficult upper stories, or uncertain structural conditions. A contractor may also be the safer choice when the required tools, dust controls, or access equipment are not available.
If the project changes the wall assembly or requires new openings, check permit and inspection rules with your local building department. For unclear fastening or flashing details, contact James Hardie technical support or a qualified building professional before proceeding.
Stop for hidden damage
Do not cover rotten framing, active leaks, or damaged sheathing. Find and correct the cause first.
Stop for unsafe access
Do not work from an unstable ladder or makeshift platform. Use suitable access equipment or arrange professional help.
Frequently Asked Questions
Q
What tools do I need to install Hardie Plank siding?
The core tools include a tape measure, level, chalk line, square, suitable fiber cement cutting tool, approved fasteners, and safety gear. A siding gauge or clamp can help keep lap exposure consistent. The exact saw, blade, nailer, and fasteners depend on the siding product and wall assembly.
Q
Can I cut Hardie Plank siding with a regular circular saw?
A compatible circular saw may be suitable when fitted with a blade designed for fiber cement and the required dust collection system. Do not use a standard wood blade without checking compatibility. Power sawing should be done outdoors in a well-ventilated area, following the tool instructions, James Hardie guidance, and applicable safety rules.
Q
Are siding gauges worth buying?
A compatible siding gauge can help hold a consistent exposure and reduce repeated measuring. It may be useful for a larger lap siding job, while a small repair may not justify buying one. Check the supported plank thickness and the manufacturer’s installation method before use.
Q
Can I install Hardie Plank siding without a nail gun?
A nail gun is not automatically required for every approved fastening method. Hand fastening may be suitable for certain applications if the current instructions allow it and the installer can meet the required fastener type, position, and depth. Do not switch methods without checking the product guide.
Q
What is the safest way to control dust when cutting fiber cement?
Use a lower-dust cutting method where practical, such as compatible fiber cement shears. When power sawing, use a suitable blade, dust-reducing saw setup, and collection system under the conditions required by the manufacturer and OSHA rules. Avoid indoor power sawing, dry sweeping, and blowing dust with compressed air. Use the required respiratory protection and follow the product safety guidance.
Q
Do I need special nails for Hardie Plank siding?
Use fasteners that meet the current installation instructions for the exact product, framing, and exposure conditions. Fastener material, size, length, placement, and corrosion resistance can all matter. A general-purpose nail may not meet the requirements, so verify the specification before starting.
Q
Can a beginner install Hardie Plank siding?
A capable DIYer may handle a small, straightforward project after studying the instructions and learning safe tool use. A full house involves more demanding layout, flashing, access, and fastening work. If the wall has hidden damage, the design is complex, or safe dust control is unavailable, hire a qualified contractor.
✦ Wrapping Up
Conclusion
The right Hardie Plank siding installation tools help you make clean cuts, hold steady rows, and fasten each plank as required. Start with measuring tools, a suitable cutting method, compatible fastening tools, and a safe work setup. Add gauges, clamps, and access equipment when the job calls for them.
Before buying anything, read the current James Hardie guide for your exact siding product and climate zone. Check local building rules, confirm the wall is ready, and plan how you will control silica dust. Careful prep and regular checks can help prevent wasted boards and costly repairs.
💡 Key Takeaway
Make a tool checklist before work begins. Confirm the siding thickness, cutting method, dust collection, fastener requirements, wall preparation, and safe access. If any detail is unclear, pause and check the official installation instructions or ask a qualified siding professional.