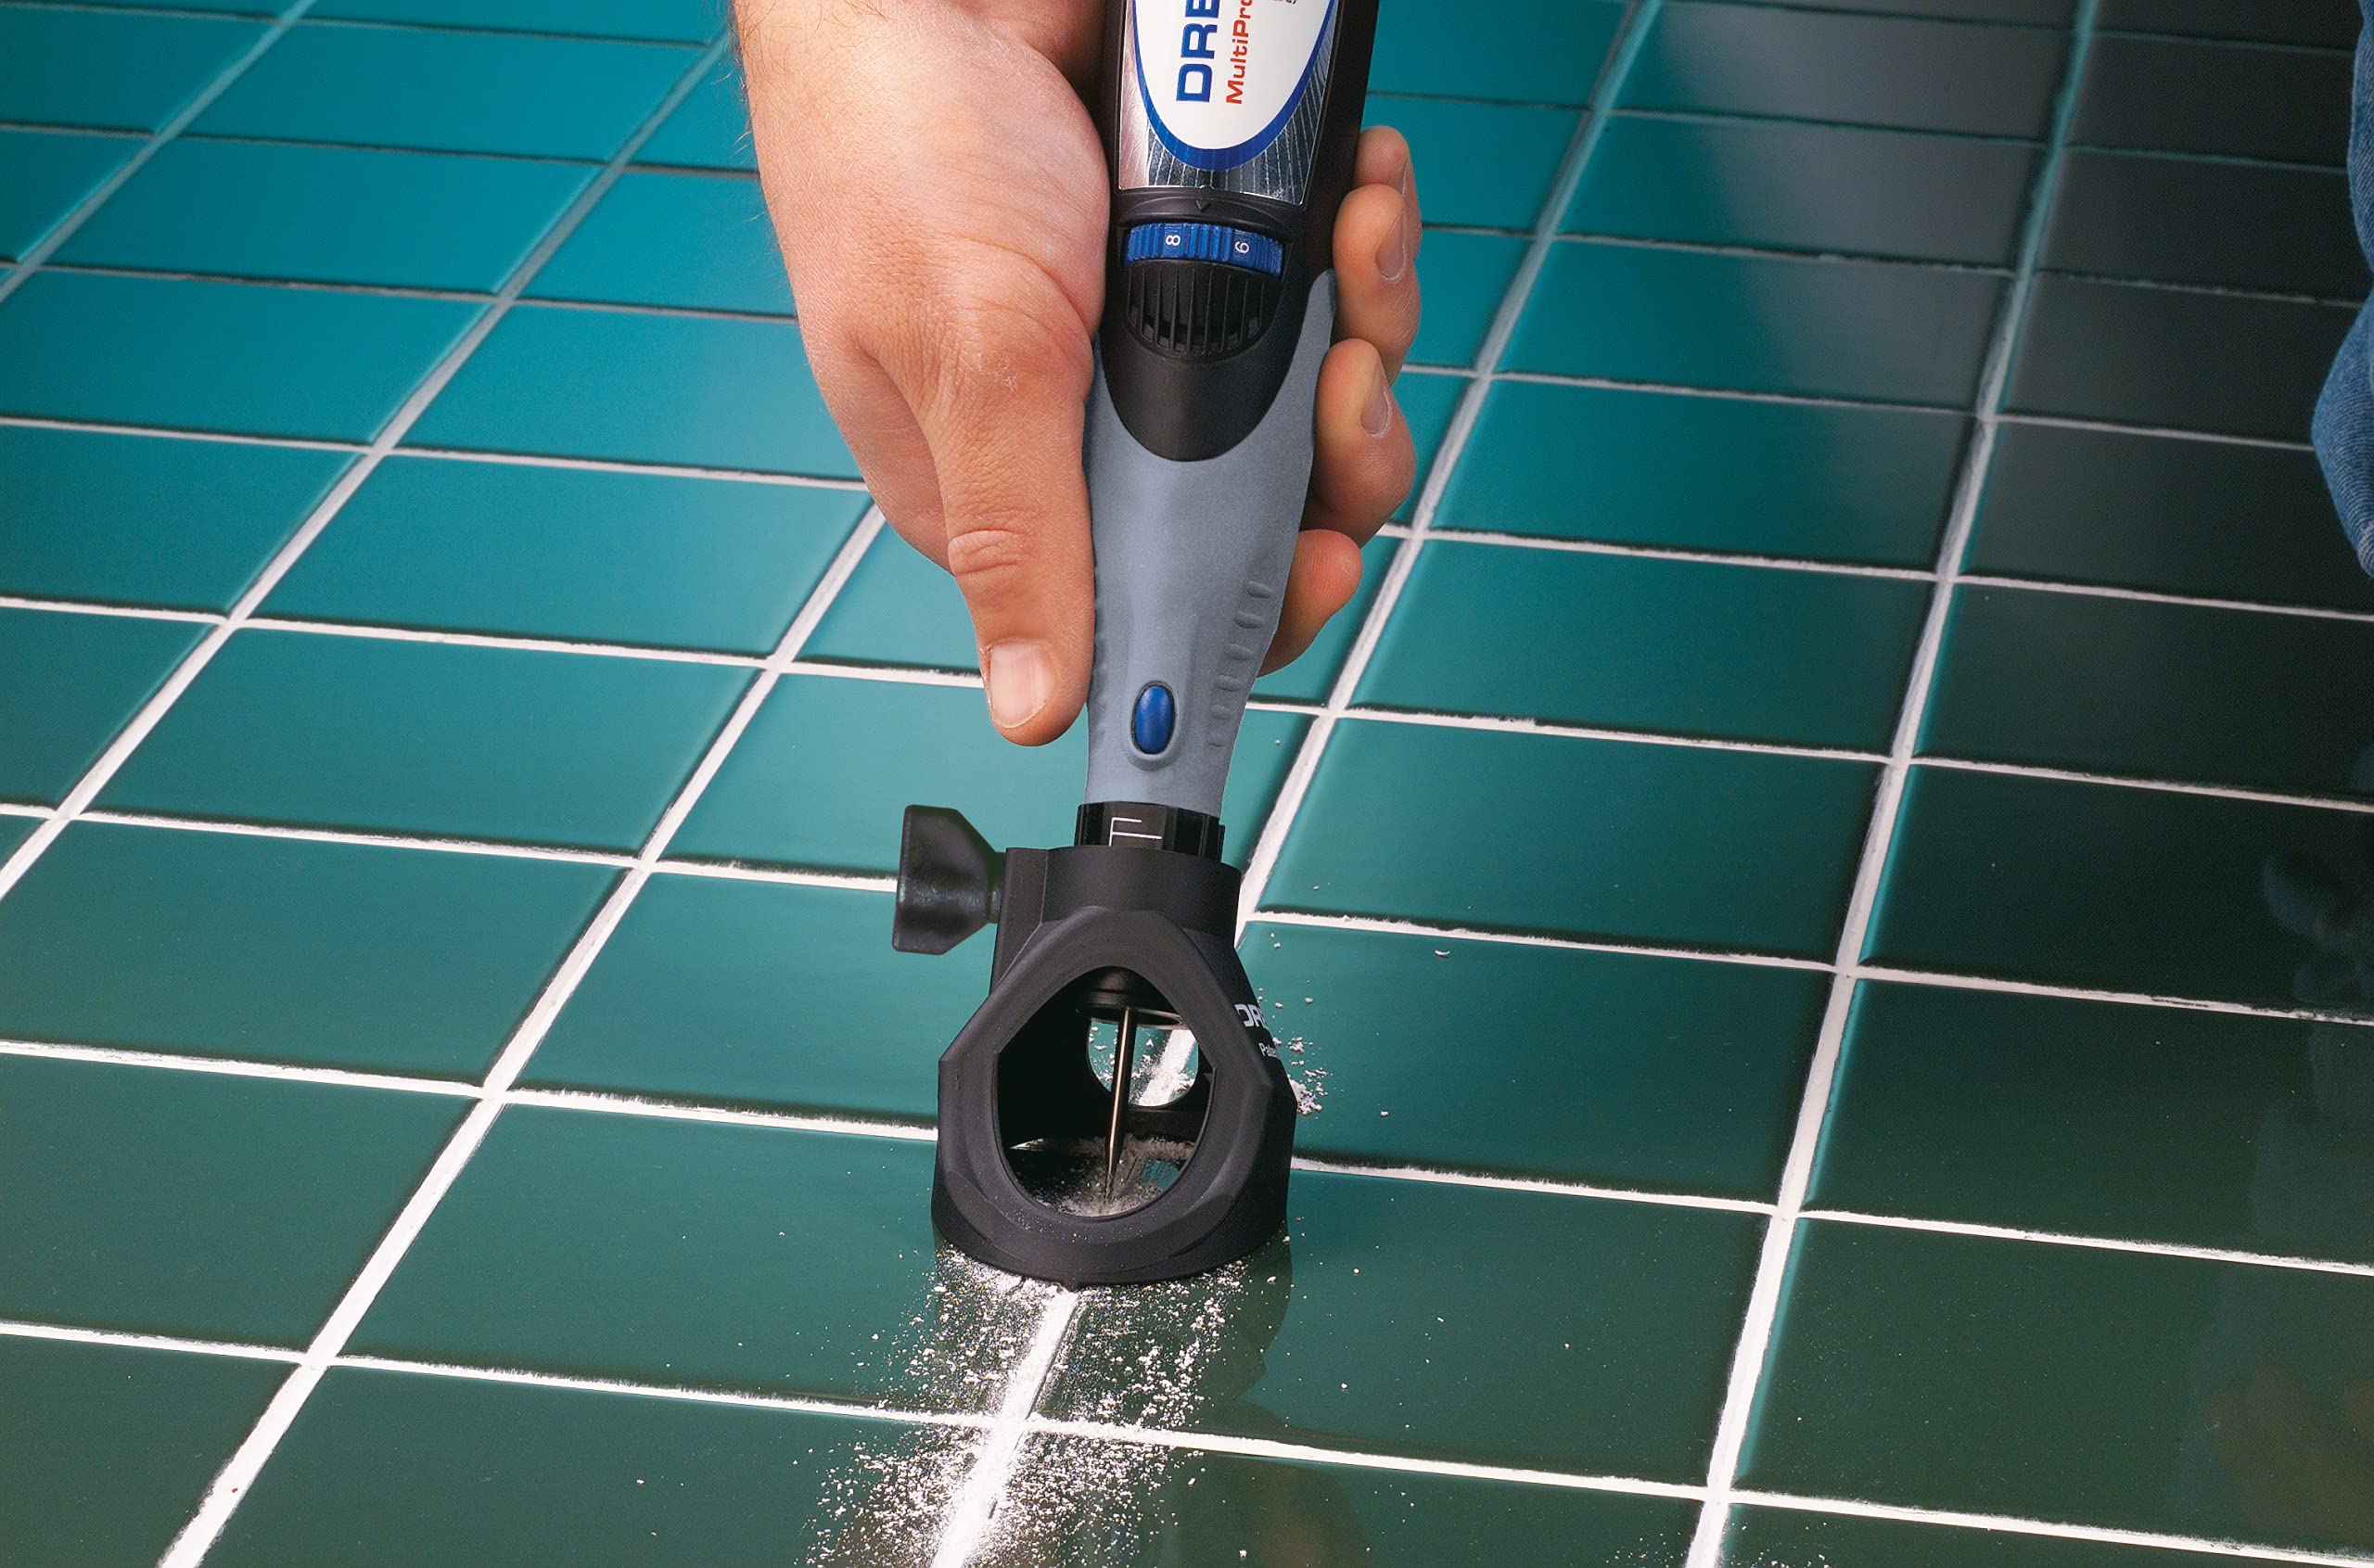
A grout removal Dremel tool can remove old grout between ceramic and porcelain tiles. Use a compatible rotary tool, the correct carbide grout bit, and a depth guide. Work slowly, keep the bit inside the grout joint, and wear eye and respiratory protection. For large floors, an oscillating tool or dedicated grout saw may be more practical.
In American homes, worn grout can show up in bathroom showers, kitchen backsplashes, laundry rooms, and tiled entryways. Cracks, stains, and loose grout can make an otherwise sound tile surface look old. A Dremel rotary tool offers one way to remove damaged grout before applying fresh grout.
The key is to use the right bit and control the cutting depth. A bit that is too wide can chip tile edges. Cutting too deep can harm the material beneath the tile. The manufacturer’s instructions for the exact tool and attachment should guide your setup, speed, and cutting direction.
This guide explains how to choose a grout removal attachment, prepare the work area, remove old grout, and clean the joints before regrouting. It also covers common mistakes, tool limits, and situations where a manual grout saw or an oscillating tool may be a better fit.
A grout removal Dremel tool is a rotary tool fitted with a bit made to cut old grout from the narrow joints between tiles. The motor spins the bit at high speed, allowing it to grind away hardened grout in controlled passes. A suitable guide attachment helps keep the bit centered in the joint.
The term can refer to the rotary tool itself, a grout removal bit, or the complete setup with an attachment. These parts have different jobs. The tool supplies the motion, the bit cuts the grout, and the guide helps control the path and depth.
Dremel makes dedicated grout removal accessories for compatible rotary tools. Its 568-01 attachment includes a 569 carbide grout removal bit. The 570 bit is a separate option for wider joints. Always check current compatibility information before buying an accessory for a particular tool model.
This setup is useful for removing damaged grout from a small tiled area. It can also help prepare joints for replacement grout. It is not a universal fix for loose tiles, failed waterproofing, or damage behind a shower wall.
Source: DIY
Rotary tool
The powered hand tool that spins the cutting bit. Use a model approved for the chosen attachment.
Carbide grout bit
The cutting accessory that grinds grout from the joint. Its width must fit the space between the tiles.
Depth guide
The attachment that helps keep the bit aligned and limits how far it cuts into the joint.
Replacement grout
The material applied after the old grout is removed and the joint is cleaned according to the grout manufacturer’s directions.
Rotary Tools and Oscillating Tools Are Different
A rotary tool spins a small bit. An oscillating tool moves a blade rapidly through a short side-to-side arc. Both types can remove grout, but they use different accessories and cutting methods.
A rotary tool with a grout guide can offer good control on short joints and small repairs. An oscillating tool with a grout blade may suit longer joints or larger areas. Neither tool removes the need to control depth, protect tile edges, and collect dust.
Choose a rotary tool
Consider one for small repairs, narrow joints, and detailed work where its guide can stay flat against the tile.
Choose an oscillating tool
Consider one for longer runs when a compatible grout blade provides better access and control.
Which Dremel Grout Removal Bit Should You Use?
Measure the grout joint before choosing a bit. A narrow bit is easier to fit into a narrow joint, while a wider bit may remove grout from a wider joint more efficiently. The correct size depends on the joint width, the tile layout, and the accessory’s approved use.
Dremel identifies the 569 bit as a 1/16-inch option and the 570 bit as a 1/8-inch option. The 568-01 grout removal attachment is supplied with the 569 bit. The 570 bit is sold separately. These measurements describe the nominal bit size, not a promise that every joint of the same width is safe to cut.
Do not select a bit based only on how fast it might remove grout. If the bit is wider than the available joint, it may strike the tile edges. Even a correctly sized bit can cause damage if it wanders or cuts too deeply.
Source: gardenequipmentreview.com
569 grout removal bit
Nominal width of 1/16 inch. Consider it for narrow grout joints when the bit and guide fit the space.
570 grout removal bit
Nominal width of 1/8 inch. Consider it for wider joints that can safely accommodate the bit.
568-01 grout removal attachment
A guide attachment with a 30-degree cutting angle and features intended to help center the bit between tiles.
How to Measure a Grout Joint
Look at a straight section of grout where the joint is easy to see. Use a ruler or suitable measuring tool to estimate the clear space between the tile edges. Check more than one spot because grout joints may vary across a wall or floor.
Compare the measurement with the actual cutting width and the attachment instructions. Leave enough room for the tool to move without touching either tile edge. If the joint is too narrow or irregular, use a smaller approved bit or a manual grout removal tool.
Check the narrowest area
A joint that looks wide in one place may tighten near a corner or around a patterned tile.
Inspect the tile edges
Chipped, uneven, or fragile edges call for extra care and may make powered removal unsuitable.
When Is a Dremel the Right Choice?
A Dremel rotary tool is most useful when the damaged grout covers a small area and the joints are easy to reach. It can help remove cracked grout around a few floor tiles, clean up an old kitchen backsplash, or prepare a small section of bathroom tile for new grout.
The same tool may be less practical for a large tiled floor. A small rotary bit covers a limited area at a time, so a large job may take many passes. Dust control, body position, and the need to keep the bit centered also become harder to manage over long runs.
Tile type matters, too. Ceramic and porcelain tile surfaces can be hard, but their edges may chip when struck by a carbide bit. Natural stone can scratch or chip, and softer tile materials may need a different method. Test a discreet area only when the tile and tool instructions permit it.
Source: vsanalysis.com
Good fit
Small repairs, short grout lines, and localized removal where the guide can remain steady.
Possible but slower
Medium-sized backsplash or floor repairs that allow good dust control and frequent checks.
Consider another method
Large floors, very narrow joints, fragile tile, or areas where the guide cannot sit flat.
Get a professional assessment
Loose tiles, widespread cracking, suspected water damage, or a shower assembly with possible waterproofing failure.
Can You Use a Dremel on Bathroom and Kitchen Tile?
Yes, a compatible grout removal setup can be used on many ceramic and porcelain tile installations. The important factors are joint width, tile condition, access, and the type of material behind the grout. The tile and accessory instructions should determine whether powered removal is suitable.
Bathrooms need added care because grout removal can expose gaps near wet areas. Grout is not a substitute for a sound waterproofing system. If the shower wall or floor shows signs of water damage, loose tiles, or persistent moisture, fix the underlying issue before regrouting.
Kitchen backsplash
Protect countertops, outlets, cabinets, and nearby appliances before cutting.
Bathroom floor
Watch for loose tiles, floor movement, and joints near drains or fixtures.
Shower wall
Avoid cutting blindly into the backing or waterproofing layer behind the tile.
Tools and Safety Gear to Prepare Before Starting
Prepare the work area before turning on the tool. Grout removal creates fine dust and small debris, and the spinning bit can chip tile or break if it binds. A clear work area gives you room to hold the tool with both hands and watch the cutting path.
Read the manual for your exact rotary tool and attachment. Dremel’s instructions for the 568 grout removal setup recommend a working speed of 15,000 to 20,000 RPM on compatible variable-speed tools. Other tools and accessories may require different settings, so do not apply that range to every device.
Wear safety glasses and suitable respiratory protection for the dust. Hearing protection may also be needed. Keep other people and pets away from the work zone, and use dust collection that is suitable for the material and tool.
Source: maxsold.com
Safety glasses
Protect your eyes from flying grout chips and broken accessory fragments.
Suitable respirator
Use respiratory protection appropriate for the dust and follow its fit and use instructions.
Hearing protection
Use it when the tool and work environment create a level of noise that calls for protection.
Dust collection
Use a suitable vacuum and keep dust from spreading into nearby rooms.
Hand brush and scraper
Use these for loose debris and final joint cleanup without scraping the tile edges.
Work light
Bright, angled light makes it easier to see grout depth and spot accidental contact with tile.
Check the Bit and Tool Before Use
Unplug a corded tool or remove its battery before changing accessories. Check the bit for cracks, chips, or other damage. Make sure the bit is secured in the correct collet and that the attachment is fitted and tightened according to the manual.
Follow the manufacturer’s prescribed no-load check before cutting. For the specified Dremel grout removal setup, the instructions call for running the installed bit at no-load speed for one minute while staying out of its line of travel. Do not use a bit that wobbles, sounds abnormal, or shows damage.
Never force a loose bit
Stop and refit it correctly before work. A bit that is not secure can cause loss of control.
Keep vents clear
Do not cover the tool’s cooling vents with your hand or the attachment.
How to Remove Grout With a Dremel Tool
The safest approach is to remove grout in controlled passes rather than trying to clear the whole joint at once. Keep the tool aligned with the grout line, let the bit cut at its intended speed, and check the depth as you go.
For ordinary grout replacement, the Dremel 568 attachment instructions say not to remove grout more than 1/8 inch below the tile face. Deeper removal may be needed for some repairs, but it should follow the grout manufacturer’s requirements and the tile assembly’s limits. Do not assume that cutting deeper is always better.
Source: www.dremel.com
Step 1: Clear and Protect the Area
Remove loose objects, mats, and items that could collect dust. Cover nearby surfaces as appropriate, and keep dust away from food, personal items, and electrical openings. Arrange the vacuum hose so it does not pull against the tool or block your movement.
Inspect the grout and tiles before cutting. Mark any loose or cracked tiles. If a tile moves when gently checked or the surrounding surface appears damaged, pause and determine the cause before removing grout.
Mark the repair area
Identify the joints that need repair so you do not remove sound grout without a reason.
Set up dust control
Position the vacuum and barriers before the tool starts making dust.
Step 2: Fit the Correct Bit and Guide
Disconnect the power source, install the correct grout bit, and tighten it using the method specified in the manual. Fit the compatible grout removal attachment and make sure its guide is secure.
Adjust the depth guide before cutting. Start with a shallow setting. Check that the bit can fit inside the grout joint without reaching the tile edges. If the guide rocks or cannot sit flat against the surface, stop and choose a method that gives you better control.
Keep the bit centered
The guide should help keep the cutting path within the grout instead of against the tile.
Use shallow passes
Remove a small amount first, inspect the result, and adjust only when needed.
Step 3: Set the Correct Speed
Use the speed specified for your tool and accessory. For the Dremel 568 grout removal attachment with the compatible rotary setup described in its instructions, the recommended range is 15,000 to 20,000 RPM. Some two-speed models have different controls, so consult the exact manual rather than guessing from the dial.
Do not increase speed to compensate for a dull bit or a poor cutting angle. A damaged accessory should be replaced, not forced through the grout.
Follow the manual
The correct speed depends on the tool, bit, attachment, and manufacturer’s guidance.
Let the bit work
Excess pressure can damage the bit, reduce control, and increase the chance of tile damage.
Step 4: Cut Along the Grout Line
Hold the tool firmly and keep the depth guide flat against the tile surface. Start with a short section so you can check the cutting path. Move in the pulling direction specified by the attachment instructions instead of pushing the bit forward against its intended direction.
Dremel’s instructions warn that pushing the specified grout bit can make it climb out of the joint or break. Follow the stated direction for vertical and horizontal work. Do not twist the bit sideways to widen the joint.
Use light, controlled pressure and several passes. Stop often to inspect the joint and clear debris with the tool switched off. If the bit catches, binds, overheats, or begins to wander, stop immediately and check for a damaged bit, poor alignment, or hidden material.
Keep a steady path
Follow the middle of the grout joint and avoid sudden movements near corners.
Do not force the tool
Allow the accessory to cut at its intended speed instead of pressing hard against the grout.
Check your progress
Inspect the tile edges and depth after each short section.
Step 5: Check the Depth
Once the surface grout is removed, stop and examine the joint. The depth should be consistent enough for the replacement grout to bond as directed by its manufacturer. Avoid cutting into the substrate or backing material.
For routine cleaning and regrouting with the Dremel 568 setup, the manual’s stated maximum is 1/8 inch below the tile face. Some grout products call for a particular removal depth or a proportion of the joint depth. Follow the instructions for the specific replacement grout and tile system when they differ from a general rule.
Good result
Old grout is removed to the required depth, while tile edges and the underlying assembly remain intact.
Stop and reassess
Stop if the backing becomes visible, a tile chips, or the joint is deeper than the intended cut.
Step 6: Clean the Joints Before Regrouting
Turn off and disconnect the tool before cleaning near the bit. Remove loose grout and dust with a suitable vacuum and hand brush. Check each joint for packed debris, damaged edges, and remaining loose grout.
The joint must be clean enough for the new grout to bond as directed by its manufacturer. Do not leave a layer of dust at the bottom or sides of the joint. Avoid washing the area with excess water unless the tile and grout instructions permit it.
Once the joints are clean and sound, follow the replacement grout instructions for mixing, application, cleanup, curing, and sealing if required. Not every grout product needs a separate sealer, so check the product label.
Remove dust
Use appropriate dust collection and a brush to clear the joints without damaging their edges.
Inspect before filling
Confirm that the grout is sound, the tile is stable, and the intended depth has been reached.
Common Problems and How to Fix Them
Most grout removal problems come from poor alignment, the wrong bit size, excessive pressure, or cutting too deeply. Stop the tool before inspecting any problem. Never try to correct a binding bit while the tool is running.
A careful check can prevent a small issue from turning into a chipped tile or damaged backing. If you cannot tell what is causing the problem, switch to a manual method or seek help from a qualified tile professional.
Source: www.lowes.com
The bit keeps slipping out of the joint
Check the direction of travel, guide position, bit condition, and joint width. Stop if you cannot keep the bit centered.
The tile edge chips
Stop cutting and inspect the damage. The bit may be too wide, the joint may be too narrow, or the guide may be misaligned. Replace the damaged tile if needed before regrouting.
The bit gets stuck
Switch off and disconnect the tool. Check for compacted grout, hidden fasteners, or hard material that the bit cannot cut. Never yank the running tool free.
The job creates too much dust
Pause work and improve suitable dust collection and room isolation. Wear the required respiratory protection. Do not sweep dry dust into the air.
The grout is still hard to remove
Check the bit for wear and confirm the speed and accessory are correct. Use several light passes rather than adding pressure.
A tile feels loose
Stop the repair. Loose tile can point to a bond or substrate problem that new grout alone will not fix.
What If You Find a Nail, Screw, or Hard Object?
A grout bit is not designed to cut through every object hidden in a joint. Dremel’s instructions warn that screws, nails, mortar, and tile-setting material can cause a bit to bind, overheat, or break.
Stop if you encounter unexpected resistance. Disconnect the tool and inspect the area without digging blindly into the joint. A hidden fastener may need a different removal method, while hard mortar may require careful work with a suitable hand tool. Do not cut deeper if you risk damaging the backing or waterproofing.
Stop at resistance
Do not use extra force or keep increasing the speed.
Protect the assembly
If you cannot identify the material or its depth, get professional advice before continuing.
Dremel Rotary Tool vs. Manual Grout Saw vs. Oscillating Tool
The best method depends on the size of the job, the condition of the tiles, and how much control the space allows. A powered tool may save effort, but a manual saw can give you more direct control in a small or delicate area. An oscillating tool may be more practical for longer joints when the correct blade is available.
No tool is automatically safe for every tile installation. Compare the access, cutting depth, dust control, and chance of edge damage before choosing. If the tile is fragile or the joint is unusually narrow, slower manual work may be the better option.
Source: vsanalysis.com
Dremel rotary tool
Useful for small repair areas and detailed cutting with a compatible guide. It needs careful control and creates fine dust.
Manual grout saw
Useful for small sections, narrow spaces, and situations where a powered bit is hard to control. It requires more physical effort.
Oscillating multi-tool
Useful for longer grout lines when fitted with a compatible grout blade. It still needs controlled depth and careful alignment.
Dedicated grout removal machine
May suit larger jobs, but the correct blade, surface access, dust collection, and operator control remain essential.
Which Method Is Best for a Small Bathroom Repair?
For a few short joints, a compatible Dremel grout attachment or a manual grout saw may be enough. Choose the Dremel setup when the bit fits the joint and the guide can sit flat. Choose a hand tool when the tiles are delicate or you need more direct control.
For a full bathroom floor, compare the time needed for each method and the effort required to control dust. If the job involves loose tiles, cracked substrate, or possible water damage, deal with those issues before deciding how to remove the grout.
Small repair
Start with the method that gives you the best control over the joint.
Large area
Consider a suitable oscillating tool or dedicated machine, provided its instructions cover the tile and grout.
How Much Grout Should You Remove Before Regrouting?
Remove enough old grout to meet the replacement grout manufacturer’s requirements without damaging the tile assembly. There is no single depth that fits every grout product, tile type, and repair. The right depth depends on the joint, the grout being installed, and the instructions for the tool.
For the Dremel 568 attachment, the manual advises against removing more than 1/8 inch below the tile face for routine grout cleaning. This is a tool-specific limit, not a universal rule for every grout replacement product. If the new grout calls for deeper removal, verify that the tool, tile, and substrate can support that work before proceeding.
Do not remove grout just to reach a certain depth if the joint is already clean and the required amount has been removed. Deep cutting can expose setting material or backing that should remain intact. Around showers and other wet areas, damage beneath the tile may require repair beyond simple regrouting.
Source: snapklik.com
Read the grout label
Check the required joint preparation and removal depth before cutting.
Follow the tool limit
Use the attachment’s depth guide and instructions to avoid excessive cutting.
Do not cut into the backing
Stop if the substrate or waterproofing layer becomes visible or appears damaged.
Does All the Old Grout Need to Come Out?
Not every repair requires removing all grout across the entire tiled surface. A localized repair may involve only the damaged joints, provided the remaining grout is sound and the new material can bond as directed. Loose, cracked, or contaminated grout may need more extensive removal.
Do not cover loose grout with a fresh layer and expect the problem to disappear. New grout generally needs a properly prepared joint. If cracking keeps returning, look for movement, poor tile bonding, or another underlying cause instead of repeating the same surface repair.
Localized damage
Remove the damaged grout and inspect the surrounding joints before deciding whether to expand the repair.
Repeated cracking
Check for movement or other installation problems that regrouting alone may not solve.
Dust Control and Cleanup After Grout Removal
Grout removal dust can spread beyond the immediate work area, so plan cleanup before cutting starts. Use a suitable vacuum and dust-control setup, isolate nearby rooms when practical, and keep children and pets away. A household vacuum may not be designed to capture fine construction dust, so check its filter and intended use.
Avoid blowing dust away with compressed air or dry sweeping it across the floor. These methods can put fine particles back into the air. Use suitable vacuuming and gentle brushing, then follow the grout manufacturer’s directions for any final cleaning.
Respiratory protection must match the hazard and fit the wearer properly. Eye protection is essential because hard chips can fly from the joint. If the work involves unknown old materials or you suspect hazardous dust, stop and seek suitable advice before sanding or grinding them.
Source: vsanalysis.com
Before cutting
Clear the area, cover nearby surfaces, and set up suitable dust collection.
During cutting
Keep the collection equipment in position and stop if dust escapes control.
After cutting
Vacuum loose debris, brush the joints carefully, and inspect them under good light.
When Should You Stop and Call a Professional?
Stop if the tile moves, a crack spreads, water damage appears, or the bit exposes a damaged backing layer. A tile professional can assess the installation and determine whether the repair needs more than new grout.
Also stop if the job creates dust you cannot control, if you cannot identify a hidden object, or if the tool repeatedly binds. The cost of an assessment may be lower than repairing chipped tiles or damaged waterproofing later.
Loose or hollow-sounding tiles
These may indicate a bonding problem that grout alone cannot correct.
Signs of moisture damage
Stains, soft backing, or recurring dampness may point to a problem behind the tile.
Unsafe cutting conditions
Stop when the accessory cannot stay centered or dust and debris cannot be managed safely.
Frequently Asked Questions
Q
Can a regular Dremel tool remove grout?
Yes, a compatible Dremel rotary tool can remove grout when fitted with an approved grout removal bit and, where required, a guide attachment. Check the tool model and accessory compatibility before use. A general-purpose bit is not automatically suitable for grout removal.
Q
What speed should I use for a Dremel grout removal bit?
Dremel recommends 15,000 to 20,000 RPM for its specified rotary-tool grout removal setup. The correct setting can differ by tool model and accessory, so follow the exact manual. Do not force the bit if grout does not come away easily.
Q
Can a Dremel remove grout without damaging tile?
It can remove grout without damaging sound tile when the bit fits the joint and the tool stays centered. Damage is still possible if the bit touches an edge, the guide slips, or the cut goes too deep. Use short passes and inspect the surface often.
Q
Is the Dremel 569 or 570 bit better?
Neither bit is best for every joint. The 569 has a nominal 1/16-inch width, while the 570 has a nominal 1/8-inch width. Choose the size that fits the joint and is approved for your attachment. A bit that is too wide may chip tile or become stuck.
Q
Can I use a Dremel to remove grout from a shower?
A compatible grout removal setup can be used on suitable shower tiles, but extra care is needed. Do not cut into the waterproofing layer behind the tile, and stop if you find loose tiles, damaged backing, or signs of water intrusion. Have a qualified tile professional assess those problems before regrouting.
Q
How deep should I cut into the grout?
Follow the replacement grout instructions and the removal tool manual. For routine grout cleaning with the Dremel 568 attachment, the instructions limit removal to no more than 1/8 inch below the tile face. Do not use this as a universal depth for every grout product or tile installation.
Q
Is a Dremel better than a manual grout saw?
A Dremel can save effort on small repairs, but it creates fine dust and needs careful control. A manual grout saw may be easier to manage in a very small area or near fragile tile edges. For large projects, an oscillating tool with a suitable grout blade may be more practical.
✦ Wrapping Up
Conclusion
A grout removal Dremel tool can be useful for small tile repairs in American homes. The right bit, a compatible depth guide, and steady movement help remove old grout while protecting nearby tile. The key is to work slowly and follow the instructions for the exact tool and accessory.
Before starting, measure the joint, inspect the tiles, and prepare for dust. Use short passes, check the cutting depth, and stop if the bit binds or the tile moves. Clean the joints well before applying new grout, and address any signs of water damage or loose tile first.
💡 Key Takeaway
Measure the grout joint first, choose a compatible 569 or 570 bit, fit the correct guide, and start with a shallow cut. Wear eye and respiratory protection, follow the manufacturer’s speed and feed instructions, and keep the bit centered between the tiles.